Ca-Clunk-k-k-k-k! Ca-Clunk-unk.
Clunk-Clunk Clunk. What could it be? My control arms have been
contorted beyond belief and the bushings are probably getting tired? The track bars
have seen their fair share of abuse. Maybe the bushings are due there too? Or
perhaps it's the exhaust rattling around on a broken or compromised hangar?
I must admit to being a
procrastinator at times. There are some things that I will let go way past the time
that any normal person would get down and poke around looking for the source of the
problem, then deal with it. Not me. Anyway, I listened to a clunking for
months but told myself it was one of the things listed above and just let it
continue. I made some half-hearted attempts to track it down but all the stuff I
checked was fine so I just let it go.
My trip to Maine was
probably the last straw for the problem. My Dad, ever aware of noises that should
not be heard, immediately picked up on the clunking. I explained it away with the
control arm theory, and we noticed that in fact the noise disappeared when the Jeep was
fully loaded with stuff. But once I returned from the trip and unloaded the Jeep,
the noise was back and it was much worse. So one day while I was in the nice clean
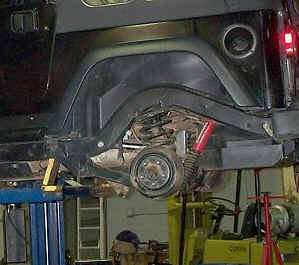
parking lot at work, I resolved to crawl under the Jeep and see what I could see. I
chanced to look way up to where the rear upper shock mounts bolt to the body floor.
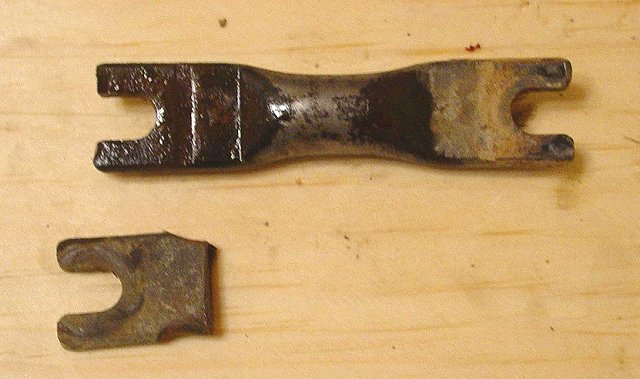
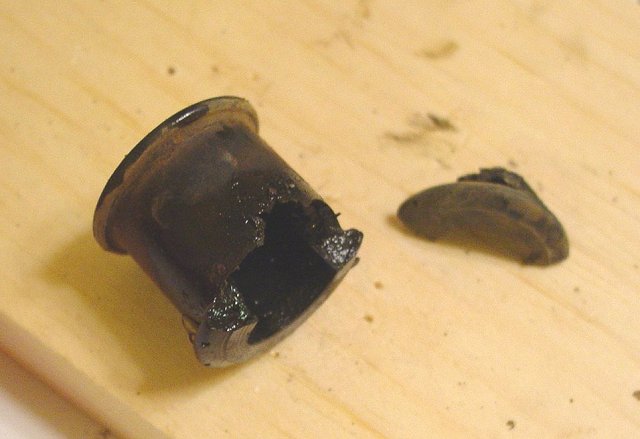
And there it was. Or, more accurately, there it wasn't. The bar pin
that passes through the bushing on the upper part of the shock had failed, the rubber
bushing had gone missing, and the top end of the shock was floating in the breeze,
connected to nothing. The rubber boot was up against the exhaust pipe (with a hole
melted through it) and I was finally going to have to take action.
|
 |
It's funny how things you
hear come back to you. Many times people had talked about "bar pin
eliminators" but I could not see a reason to get them. My shocks were holding
up fine, those pins looked pretty beefy, and I couldn't imagine having any problems with
them. I wrote off the "bar pin eliminator" as another of those things that
people buy when there is nothing left to buy for their Jeep. I didn't need them and
I wasn't going to spend any time worrying about them.
Now I could see first-hand
what they were for, and why I would now be buying them. But first I had to deal with
the missing rubber bushing. The shocks were still in fine shape with no leaks,
dents, corrosion, or other signs of failure. It made no sense to replace them when
all that was needed was a rubber bushing for one side. I called Edelbrock and
ordered a set of replacement bushings and while I was at it, replacement bar pins as well.
I figured I would have to get the repair done and didn't want to wait any longer
should the bar pin eliminators take a while to arrive. The bar pins were my
"Plan B".
|

 |
 |
The Edelbrock people were
incredibly responsive. I called the toll-free tech support number and quickly had
two new bushings and bar pins on their way to my house. I ordered two of each as an
afterthought, thinking I really only needed one but decided to be prepared for problems.
That turned out to be a good move.
With the replacement parts
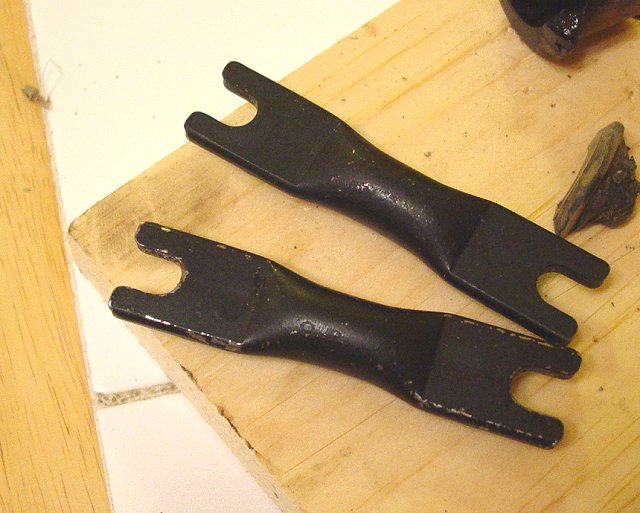
on the way, I located the best price on J.K.S. Bar Pin Eliminators and ordered a set for
my rear shocks. I was surprised that they were so inexpensive, and quite impressed
when they arrived. They are machined and cad plated, with a well thought out design.
But I had read horror stories about their installation so I patiently waited for
them to come thinking my "fun" had not yet begun.
|
I needn't have been so
afraid. When they came, it was easy to see how they went together. In the
meantime I had found a site that described the installation. There was nothing
complicated about it. So when the bushings arrived, I had at it.
|
The first job was to remove
the shock. That was the same old process as always: Remove the bolts and take
it down. I had the luxury of having the upper connection already severed on the
passenger side. I removed the two bolts from the mounting point and retrieved the
remains of one piece of the old bar pin. The rest of it was probably on Dictum Ridge...
|
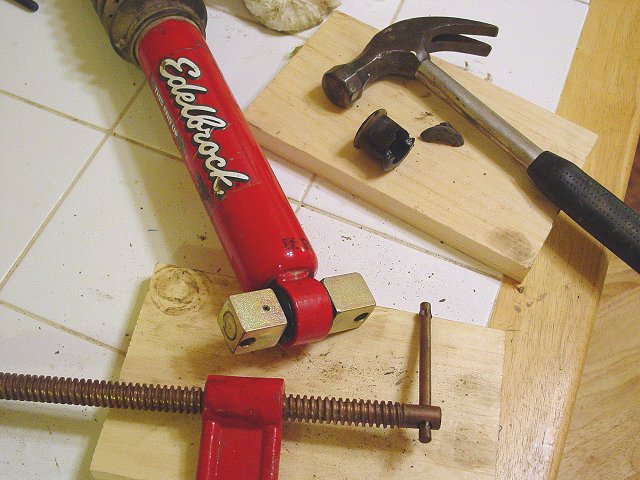 |
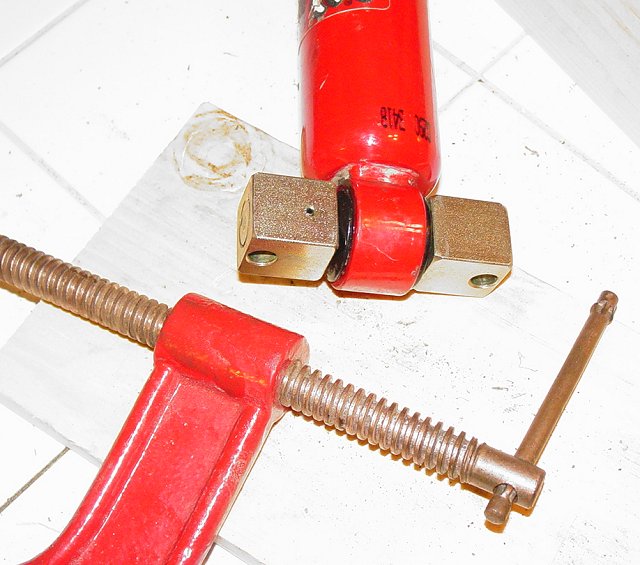
I brought the shock into the
house, along with a C-clamp and some pieces of wood. I put some dishwashing liquid
on the new bushing, lined everything up on the C-clamp, and with the help of my wife,
guided the new rubber bushing into the opening on the shock. Mindlessly easy with
the right tools and four hands. Next I inserted the pin through the rubber bushing
and attached the other side of the bar pin onto the shaft. With the hole lined up, I
sent home the set pin. In my case, I did not have to clamp the assembly together to
get the holes to line up, although I have see instances where this may be necessary.
|
 |
 |
With the dreaded portion of
the work done (on one shock), I reinstalled the shock onto the vehicle. The only
comment I have about the parts is the choice of the hex head bolts. Wh-h-h-hy?
What a pain. I just don't have enough reasons to have a set of hex sockets so
installing these bolts in that tight space really sucked.
First with a "nest of
hex keys" that I keep on board, then later, on the drivers side shock , a hex key of
the "L"-shaped variety (6mm). I can't wait 'til it's time to remove
them...
I should be quick to add
that I could have replaced them with something more to my liking but this work was being
done between eating supper and going to bed so there was not the luxury of a trip to
Bolt-Heaven-dot-com. This was the only part of the job that I could have done
without. Everything else went incredibly smoothly.
|
Update: 12/12/03
First of all I been reading your jeep web site
for over a year, always enjoy your write ups and all pics, really a great site!
Just got a jeep last year and you have been very helpful in pointing me in
right direction. Keeping things small for now, OME lift 31 inch tires…
Anyway, was reading your write up on the bar
pin eliminators, I just installed mine a few months ago. I agree the hex bolts were
a real pain and my 6mm hex socket wouldn’t fit because it was to close to the side of
jeep. My solution was to make a trip to sears and buy a 6mm short/long hex key set.
I then cut the long hex key with hack saw and tapped it in a 6mm socket, kind of a
long extension hex.
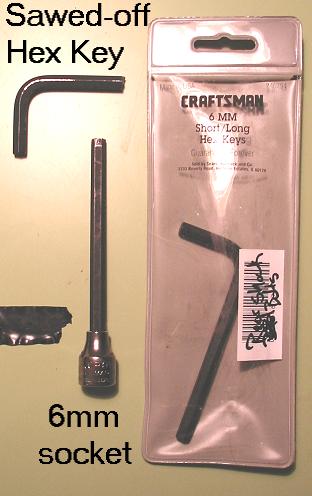
From what I’ve read of your site you
probably already have a better solution : ) , just thought I pass on my one good
idea so far…
Thanks for taking time for all the great write
ups…
Paul D.
Hey! That's a great
idea. I liked it so much I put it here so I wouldn't forget when it came time to get
up in there again and mess with it. Thanks Paul!
Suffice to say that I did
the other shock. Lo-and-behold the rubber bushing was on its way south as well so
the extra bushing was a welcome resource. With both shocks re-installed it was time
for a test drive. Yes! No more Ca-Clunk. No more boing-oining-oining!
Less front-end dive on hard breaking. And it's a little harder to lift my
left-front wheel now than it has been for the last couple weeks...
|
 |
