Oil and Filter
While my six-year-old stood around asking
his usual 20,000 questions about the job, I changed the oil and filter. He got a
lesson in basic maintenance and I got a good buddy to keep me company while I did an easy
job that is otherwise fairly boring. One filter and 6 quarts of Castrol later, we
called it done and went in for supper.


Plugs, Cap, Rotor, Wires
I finally got around to changing my
plugs, cap, rotor, and wires. I'm not going to admit how long the wires were in
place, but with 130,000 miles on my Jeep, I decided it was time to replace them all.
No sense tempting fate.
| Autolite Resistor Plug |
985 |
.035 |
OE Style |
| Mopar CABLE PACKAGE, Ignition |
8350 7178 |
|
|
| MoPAR CAP, Distributor |
5602 6876 |
|
|
| ROTOR, Distributor |
5602 7019 |
|
|
I bought the parts, with
the exception of the plugs, at the dealer. I figured that since the ones I had were
manufacturer parts and they had lasted so long, why fool with a good thing?

My history with vehicles predates most
peoples birth so I have a long history of messing with gapping points and installing
condensers. What a joy not to have those to deal with! In their stead, there
was nothing more than the reputation of the number one plug to confront, and some sticky
plug wire boots to wrestle off.


I decided to take no prisoners - grabbed
a drop-jaw pliers and twisted off all the wires, one at a time, after carefully marking
them to their respective locations and routing, and laying out the new cap and wires in
the same pattern.
One of the wires came off in pieces, the
others are probably compromised by the rough handling and their sheer age. I
unscrewed the first of two retainers that hold the cap in place. It came out nicely.
I started to unscrew the second and it snapped off like a piece of dry spaghetti!
DOH! This is not good! I finished the disassembly while bracing myself
for a troubled finish.
When I got the cap out of the way, I
struggled to retain my civility when the kids came by to see what I was doing. No
sense hurting their feelings with my bad attitude. I got myself calmed down and
located a center punch. Put a mark on the center of the broken screw. Got my
drill set up with a little bit, and started drilling. The screw must have been hard
metal because the drill didn't even touch it. I got a slightly larger and much
harder bit and tried again. This time it went through it like butter. Just
when I thought I was home free, the hole on the distributor housing broke off!
Double-DOH!
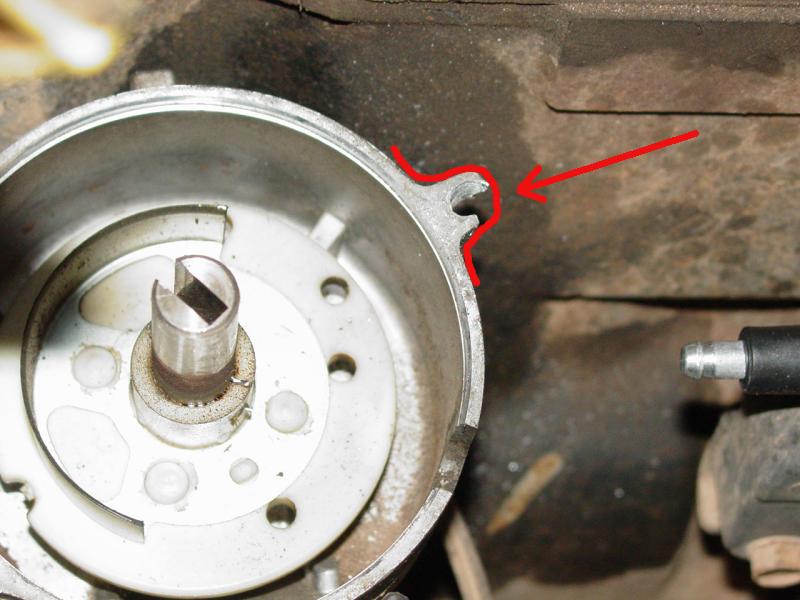
Now I had the broken screw out, and
almost nothing left to fit a new screw. Why in the world did they use screws?
The Volvo's I used to work on had clips like the ones that hold the cover on the stock air
filter box, and they never broken, were very reliable, and easy to handle. That's
Bosch for you... Oh well here I am with a broken distributor housing and a job to
drive to in the morning...
I decided that I might as well put the
plugs in and reassemble everything as best I could, then deal with the fastener for the
cap.
I took the old plugs out one by one,
working from cylinder 6 to cylinder 1. No sense in continuing my bad run of luck by
starting with the infamous cylinder 1 plug! Each plug came out with little problem
though they were a little tight. The beauty of the right tools, experience, and some
leverage made the removal process pretty easy. The Jeep is just a little too tall to
get enough leverage by standing on the ground so I found myself up on the front bumper to
get at it.
I checked the gap of the new plugs before
installing them - they were all spot-on (.035). I put a dab of anti-seize on each as
I threaded them back into place and snugged them down. Routine. Finally I
reached the number 1 plug. It is tucked behind the A/C compressor. But the
plug socket snaked down in nicely, the universal adapter snapped in place, and the
extension put the ratchet in a great spot to twist out the plug with no more trouble than
the other five. Bah! Must be a bunch of sissy girls working on their Jeeps
that made that rumor up! (See you on Jerry Springer, ladies!)
With the last plug in place, I dropped
the cap into place on the distributor after first putting the new rotor in place. I
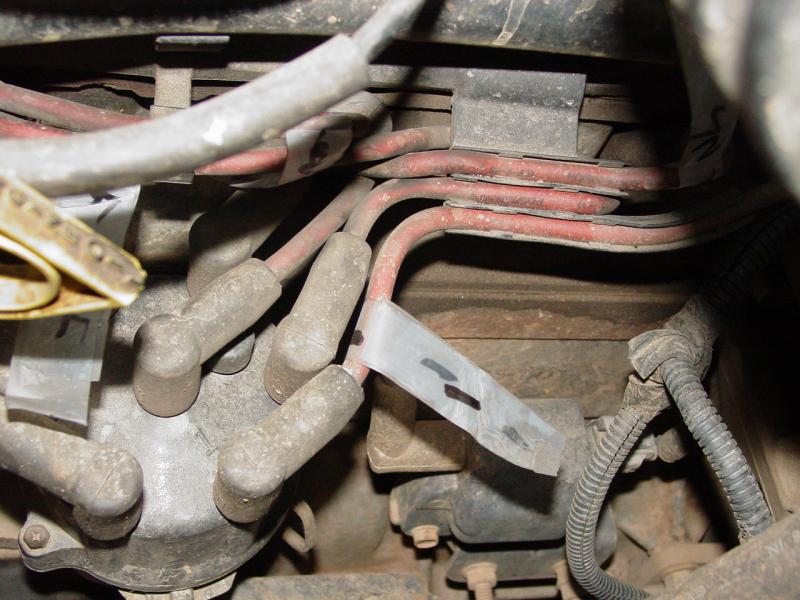
ran the wires to their respective plugs and made sure they were all properly seated and
threaded in the holders, like they came from the factory, nice and pretty...
- #1 goes from the cap to
the plug and the wire goes in the lowest slot on the front loom holder
- #4 goes from the cap to
the second lowest slot on the front loom and runs forward to the end of the
loom and then ducks behind the loom and up to the middle loom holder
which has two rows, then to the plug
- #2 goes from the cap to
the top slot on the front loom and then to the plug
- Coil goes from the cap,
down between #1 and #4 to the coil, routed so the wire does not touch anything, away from
the block
- #6 goes from the cap to
the top slot on the rear loom and then to the plug
- #3 goes from the cap to
the middle slot on the rear loom and runs to the rear then ducks behind the
loom and comes up to the middle loom holder and then to the plug
- #5 goes from the cap to
the bottom slot on the rear loom and then to the plug.
For this to work, you have to have the
correct wires connected to the cap in the correct positions. You might be able to tell
something by the shape of the ends in the pictures on my write-up; I figured out which
wires went where by copying what was in my Jeep, probably factory original or set up by
the dealer when it was last done...
Then I threaded the remaining good screw
holding the distributor cap in place. My first thought was to use a long screw and
nut that I had lying around to replace the one that would no longer thread in because the
hole to hold it was gone... I found the nut and bolt too short and momentarily
considered how my wife would feel about driving me to work at 5:30 AM... Then it
occurred to me that I just might be able to hold the cap in place temporarily with a wire
tie.

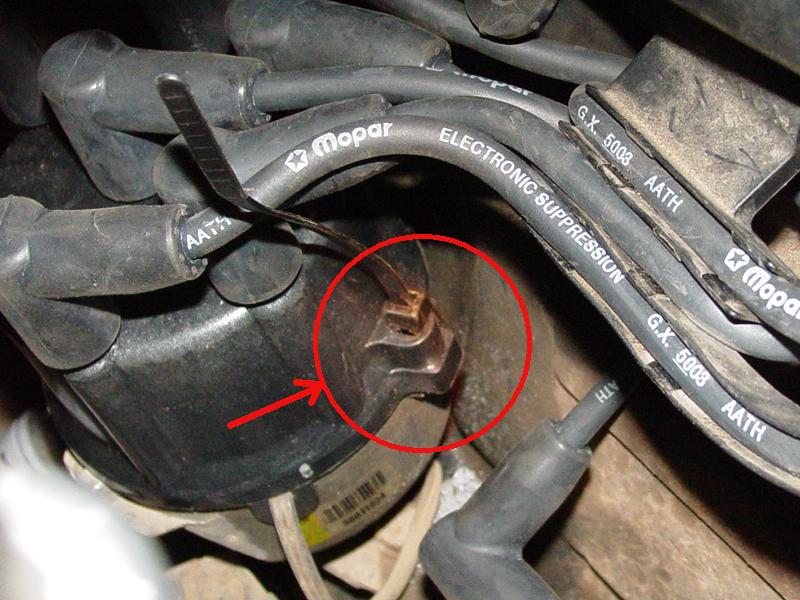
I retrieved one from my supply store and
soon had the distributor cap snugged down and seemingly secure. I reviewed the plug
wiring pattern and then fired up the Jeep. I was very happy to see it start right
up, run smoothly, and not make any untoward noises or unexpected behavior. I will
run down to one of the hardware stores in the next day or two and find a nut and bolt that
will be suitable to replace the temporary wire tie that currently holds the cap in place
in the front. Another little job out of the way!