Attributes:
Line Thread Size:M18X1.5
# of Mounting Holes:3
Input Shaft Diameter:3/4"
Output Shaft Diameter:1 1/4
# of Turns Lock to Lock:3 1/16
Type of Hose Ports:O Ring
Additional Contents:O Ring Kit
Pitman Arm Nut: 32~33mm/ 1 3/8"?
Pitman Arm puller: 1 5/16" opening
Aside from everyday tools, a pitman arm puller/remover is
needed. I found a couple that would work. I caution that the
one that I got from Napa was a fine tool but it was not wide enough to
fit the Jeep pitman arm. These listed below will work.
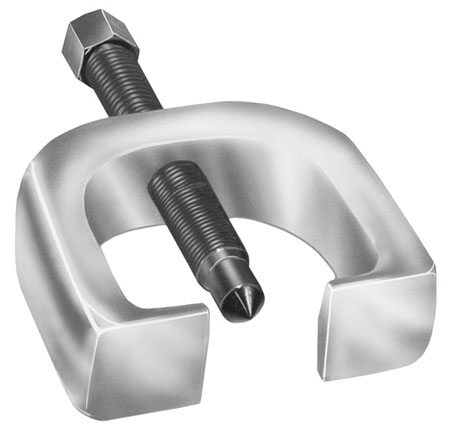
OTC 7314A Pitman Arm
Puller
This puller will handle nearly any Pitman arm job on
passenger cars and light trucks. It features special forged jaws shaped
to fit the job, ensuring a positive grip every time. Spread between jaw
tips: 1-5/16"
I removed the
steering box skid plate.
This was simply a matter of removing the nuts and bolt that held it to
the steering box mounting point and front bumper.
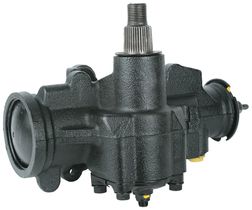
Next I removed the
pressure and return lines from the power steering pump reservoir and
drained the fluid that came out into a catch basin. I capped the
openings in the pump. Here's a drawing of the basic components.
6/29/07
I had a little trouble
determining the size of the bolt that holds the pitman arm. I
measured it and determined it to be 33mm or 1 3/8" - both socket sizes
were unavailable at Advance Auto so I grabbed one each 32mm, 34mm, 1
1/4", 1 1/2". The best fit though tight was the 32mm so I used it
to remove the pitman arm nut. I was fortunate that it came free
reasonably easily with a 1/2" long handled drive. I laid on my
back with my feet on the drivers wheel and pulled on the drive more or
less as if I was standing up on the wheel. The tire turned some
until the steering wheel locked into the dash, then the nut came free.
I did soak it overnight with some penetrating oil.
I pushed the rubber
dust seal up off the pitman arm shaft to make room for the pitman arm
puller, fit the puller over the shaft, centering the pin on the puller
pin into the depression on the pitman arm shaft. I left the pitman
arm shaft nut on the shaft a few turns to keep the puller from sliding
off. I tightened the puller, tapped the arm where it goes around
the shaft, tightened the puller some more, tapped some more, tightened,
tapped and soon the arm just eased off the shaft. Again, I had
soaked the shaft in penetrating oil overnight.
I made sure the wheels
were straight before I removed the pitman arm from the shaft, and just
let the arm hang free on the drag link.
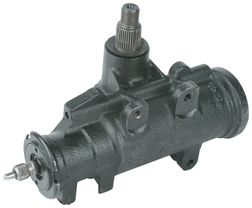
I put the nut on the
new steering box together with the lock nut and dust seal and put it
away for the night.
6/30/07
With the pitman arm
out of the way, the rest of the job to remove the steering box went
quickly. Ted stayed with me to help. We removed the bolt
that holds the steering column to the steering box, the three bolts that
hold the steering box to the frame.

With the box supported
by a jack stand I removed the pressure and return lines from the
steering box and we were done (with removal).
Next we sorted out all
the tools and pieces needed to install the new box. I retrieved
the rubber dust cover that slides over the pitman arm shaft, put some
new grease on it, and slide it up onto the new steering box. The
new box came with one of the temporary covers broken off with the
threaded portion in the hole. This was a quick job for an
easy-out. There didn't seem to be any pieces of the plug missing
that could have entered the pump so we continued.
I cleaned up all the
fasteners and hoses. I treated all the nuts and bolts as well as
the line flare nuts with Anti-seize compound. We put the steering
box back in, after first installing new "O" rings and then attaching the lines to
the box, and threading them
back into place under the Jeep. I taped the upper hose ends to
prevent debris from getting inside.
We installed the
steering box by attaching the steering column to the input shaft.
There's a flat spot that lines it up. Then I got the frame bolt
holes lined up and the bolts installed. Then I installed the
pitman arm. Finally we reconnected the upper lines.
There are several
documented ways to fill and bleed the steering box. Since I did
not have a catastrophic failure (steering gear parts circulating through
the system) and the pump didn't fail, I felt I could top up the fluid
and be done with it. That still required that I fill the
reservoir, cycle the steering wheel back and forth several times (all
with the engine off and the front wheels off the ground to make it
easier). I repeated filling, cycling until no more fluid was
required to fill the reservoir to the "cold" mark on the cover stick.
Then I turned on the
Jeep and ran the steering back and forth a few more times and turned off
the vehicle. It took very little fluid. I started the
vehicle and let it run while cycling the steering back and forth with
Ted watching for leaks. We checked for leaks at the reservoir
pressure and return, at the steering pump where the pressure and return
lines connect, and the pump itself. Dry as Death Valley in summer.
The steering gear made
no untoward noises and the steering worked fine. Mission complete!
The biggest part of this job was getting the correct puller, fluid,
socket, the part itself. Once the difficult job of sourcing and
pulling was done, it was just six fasteners!
After the Jeep sat for
several hours while I reinstalled my
winch and refinished winch plate, I started it up and winched it up
my driveway to tension onto the winch spool the cable that had been
removed when I sent the winch out for service. I let the Jeep run
while I did this to keep the battery charging. When it got to the
top of the drive, I let it sit running while I finished wrapping the
cable to store. When I got done I noticed a small drop of
something on the pavement precisely under the same spot as the leak I
had done the job to fix! I pulled the Jeep up to take a look and
found the steering was hard! Great. All this and it still
was bad!
I shut off the Jeep
and looked at the fluid in the reservoir. It had lots of little
bubbles in it. So I let it sit for about 10 minutes while I took a
look at the service manual to see if I could diagnose the problem (from
a selection of several defects listed for the pump or box). All
the symptoms I had pointed to two primary causes - not enough fluid or
low tire pressure.
Wanting the easy
answer these choices sounded good but I remained skeptical. I went
back out and cycled the steering through several back and forth motions
again. The fluid went down a surprising amount but no more leaking
showed. I topped up the reservoir, started the Jeep and ran the
steering back and forth some more. I shut off the Jeep and checked the
fluid. There were no bubbles and the fluid was staying up.
The steering felt fine though tighter than I remember. But since I
have been driving our Cherokee and Commander for the last several weeks
during all this restoration work, I wondered if perhaps I was comparing
the feel to a faulty memory.
I checked the tire
pressure and found it was down by about 12psi on all four tires.
So the combination of air in the system and low tire pressure was indeed
the likely cause of the stiff steering. The manual was right.
I took the Jeep out to return some unused sockets and run some errands.
At each stop I checked the fluid. No bubbles and only a slight
drop in level. When I got home I filled the reservoir up to the
mark. Should be good to go - finally...