J.K.S. "Quicker" Disconnects

JKS Mfg logo

JKS

Quicker Disconnects

4X4 ICON 2000 - 2008 The DVD! - Click here for details!

4X4 ICON 2000 - 2008 The DVD!

11/23/2001

Why? | Parts and Tools Needed | Installation | Additions | Update 10/27/04


Note:  We recommend the JKS "Quicker" Disconnect for the Wrangler TJ

- Listed on Amazon as the MORE 2000 Sway Bar "Quicker" Disconnect.


It took me too long to get around to selecting and installing disconnects.  The main reason was that I saw so many different types in use and saw so many different problems with each, that I didn't want to commit to a brand and experience the same problems.  None of the many different brands I saw were very convenient.  I had not seen the JKS in wide use, probably in part due to the price.

On nearly every ride where people had disconnects, I saw hammering, pinched or cut fingers, cussing, bumper jumping, fishing, fumbling, lost retainer pins, and just endless kinds of silliness that I just didn't want to have the pleasure of experiencing first-hand.  I even got to connect peoples "quick" disconnects while they contorted themselves around their swaybars, and it just ain't fun.

My previous experience with sway bars is much different.  I always was hunting for the stiffest, thickest bar that gave away as little as possible.  This was to provide less lean in corners, and change road handling in ways favorable to spirited driving.  And I NEVER disconnected them except to replace the bushings.  So it took me some time to get used to the idea of NO sway bar as being an advantage.  Then I had to take some quiet time to think through the dynamics of running off-camber with no sway bar.  Under what circumstances would it be a liability?  Would it be advantageous?  When riding tame trails where it was almost pointless to have 4WD engaged, would there be any point to disconnecting?

Everyone who has spent any time running with experienced 4-wheelers will know that the reason to disconnect is to get better traction by keeping the wheels on the ground, instead of lifting a wheel (through the sway bar) when the ground is not flat.  There is another advantage that is more subtle to those not equipped - that the ride is smoother on rough terrain.

So finally I had a chance to observe a variety of solutions, listen to a variety of explanations, and see for myself what kind of difference it makes to disconnect the sway bar.  I overcame my "sports car" brainwashing, and was ready to make the leap. 

This is altogether way too much analysis for such a simple device.  But you get the drift...

There was one thing that I had been waiting for ever since I heard about it:  Addco All Terrain Bar.  Simply put, it is (or is purported to be) an in-cab controlled front and rear sway bar disconnect system.  It was announced at the 2000 SEMA show, where it won an award.  Long story short, repeated calls to the company, along with e-mail to any of several addresses, over a period of a year, yielded NO response.  No literature, no promise of an availability date, no return calls with prices, NOTHING.  The closest I came was a couple of photos on the web (see below) showing front and rear sway bars with solenoid actuator devices grafted onto the sides that would connect/disconnect a pivot point, effectively controlling sway bar connection/disconnection remotely through a switch.  I would pay double the rate of the highest priced manual solution - if I could have gotten somebody to take my order...   I'm still dreaming of this product even as I install the next best thing.

Finally I resigned myself to the fact that the Addco product was not ready for prime time, and service would probably suck, if their pre-sales treatment of prospects (that would be me...) was any indication.   So, reluctantly, I went with my first choice among traditional disconnects - JKS "Quicker" Disconnects.

The order was placed on their web site on the 19th of November, 2001.  The disconnects arrived at my house the day after Thanksgiving - three days later.  Bonus points for fast service. 


Why? | Parts and Tools Needed | Installation | Additions | Update 10/27/04


What you get:

JKS Disconnects, pins and retainers, storage pins, rubber bands, washers, sticker, instructions

What you need to install them:

Threadlocker RED Threadlocker - RED

This is the high-strength flavor - recommended by JKS for the cross pin on the u-bracket that is attached to the sway bar.   This assures that the cross pin does not come unthreaded.  Do not use any other color since it will not be strong enough.  I spent three hours driving around trying to find the RED and was about ready to give up when I found one last tube at Trak Auto.  I honestly would NOT have installed the disconnects until I found it.   I will also use this on the storage pins that thread into the frame since I expect they will need a high-strength threadlocking compound to keep them from getting loose on the frame.

Threadlocker BLUE Threadlocker - BLUE

Although the instructions do not call for it, I chose to use this medium-strength compound to lock the threads that hold the stainless steel pin to the lower bracket and the bolt that holds the U-bracket to the sway bar.   This will prevent loosening as well as prevent dirt from entering the threads, should I decide to remove them later.

Tap and Drill Bit The JKS Instructions call for drilling a hole into the frame using an "F" bit (17/64") and then threading the hole with a 5/16 18 tap.  My first store check was at the Sears tool department.  Bad move.  It was the day after Thanksgiving and the store was full of customers and temporary help.  The short story is that I could get the tap if I bought one of two sets that contained a comprehensive selection of taps, dies, and handles, priced between $40 and $80...  NOT!  I just need ONE bit and ONE tap, and OPTIONALLY, ONE tap handle.  After two more stores with no luck (Home Depot and PepBoys), I found this two-piece set for $7 at Lowes.  Now we're talking turkey!
Tap Handle Another $7 bought the handle for the tap and makes sense for the purpose of simplifying the job and doing it right.  Lowes comes through again.
Metric Allen Key Set I already have a set of metric Allen keys but I really don't want to carry them all loose in the Jeep.  So at the same time I was shopping the other tools, I grabbed this nest of metric Allen keys - it has the 6mm Allen key needed for the job, and can go live on board my Jeep for trail work if needed.  It was about $6 so what the hey?
T55 Torx Head Go find yourself a T55 Torx bit for your 3/8" socket drive.  I got mine at Pep Boys after another ridiculous search.   This is the second time I am using it - the first was when I installed my tow hooks.

You will also need various wrenches, I ended up using an adjustable wrench because I still haven't gotten a full set of metric sockets.   I also used a couple different sized vice-grips when the T55 socket didn't work on the passenger side lower bolt...

Center Punch The other thing that will make installing the storage pins is a good center punch for marking the spot to drill.  This will prevent the drill bit from wandering while you start the hole.    

As a friendly bit of advice to JKS Manufacturing, Inc, I would have paid them cost plus a reasonable profit (roughly my gas burnt and then some to cover the time I wasted to scavenge the tap, bit and threadlocker) to have been shipped to me all of a piece with the disconnects - say double what I paid for those items retail?.  The cheap cardboard furniture manufacturers supply everything needed to assemble their furniture, which makes it very convenient.  They could add it as an optional item for those folks like me who don't have it.  In any case, I am now ready to assemble the parts.


Why? | Parts and Tools Needed | Installation | Additions | Update 10/27/04

Installation

This should be a pretty easy job.  The instructions basically tell you to remove the old connector and install this one (per some details) in it's place.  Like I said, I have installed loads of sway bars and it is no big deal.  The only part that is going to be tedious is the location and tapping of a threaded hole to affix the storage pins into the frame.   But this too is a pretty simple operation provided you measure twice and drill once.  Tapping a hole is not much different than screwing a wood screw into a pre-drilled hole in a board.  If you really don't want to try doing it, you could go with tying the swaybar and disconnects up with wire ties but really, that's what is so elegant about this particular set - the fact that you HAVE a place to park the bar and disco once you disconnect.  For little trouble you have a great solution.  The only thing I think I will add to this that was not supplied is a few extra Clevis pins in my boonie box so that I don't have to spend too much time fussing over a lost one.   Most tractor supply places have these things in spades for a couple bucks each so it's cheap enough to have extras.

In preparation for my planned morning install work, I charged the batteries in the CamCorder (optional step), squirted the nuts and bolts on the old sway bar connector bar with penetrating oil the night before, so that it might help make removing the old nuts easier.  I read and re-read the instructions and learned the order of assembly, and other things so that by the time I do the work, it will be pretty well embedded in my pea brain.

Don't remove the front tires - it isn't really necessary.  It would be nice but having weight on the front axle makes it easier to take apart the swaybar connectors and is the only way to set the length properly.

The installation instructions start with installation of the new parts but do not deal with removing the old parts.  It actually took me longer to disassemble the stock connectors than it did to install the new ones (Well that's the point isn't it?).

First, put the key in the ignition and unlock it so you can turn the wheels left and right.  Turn the wheels all the way to the left.  This will enable you to start on the drivers side connector.

Stock Connect

Remove Stock Sway Bar Connectors...

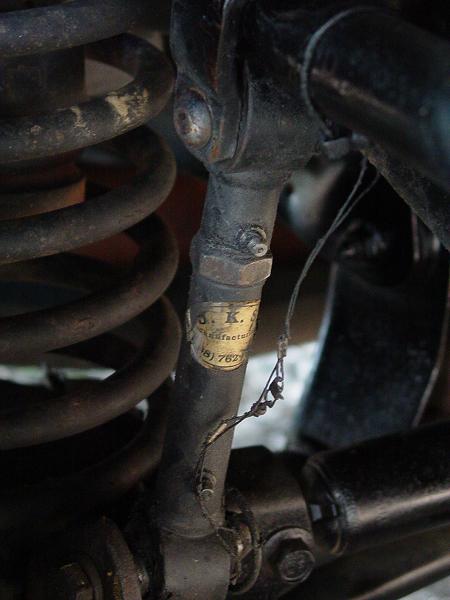
Here is a photo of the stock connector with the top nut loosened just a bit.  Remove the nut from the top, and the bolt and nut from the bottom.  Turn the wheels to the right and do the passenger side.

Removing lower bolt from stock connector

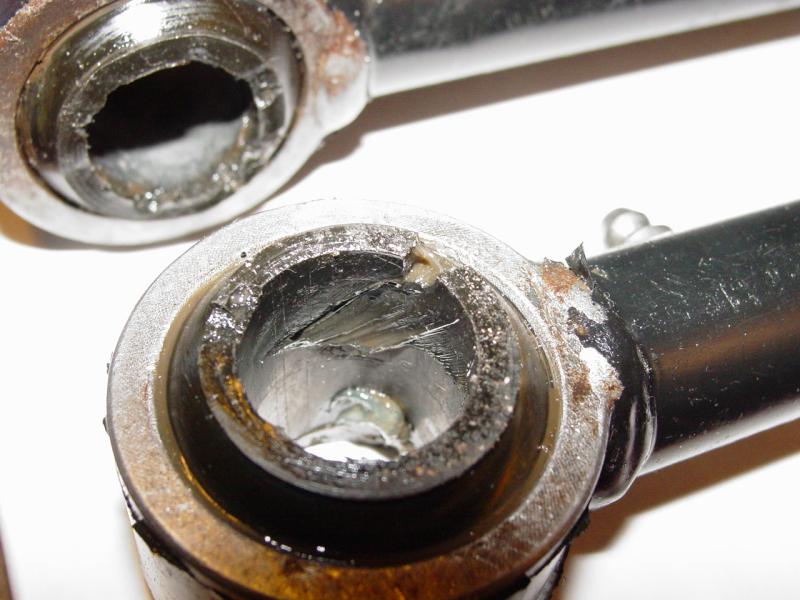
The bolt and nut on the top and bottom, drivers-side came away very nicely with the T55 Torx key and the adjustable wrench.  The passenger-side one (shown above) was a lot more stubborn.  I tried partially unthreading, then backing it off, spraying with penetrating oil and then unthreading again.  Finally I abandoned protocol and put my big nasty vice grip on the head of the bolt and then unceremoniously unthreaded the stubborn nut.

The top nut on both sides unthreaded easily on both sides but the stud is caught in the swaybar and needs coaxing to be removed.

Removing top Nut

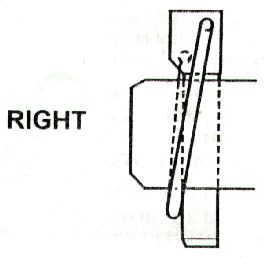
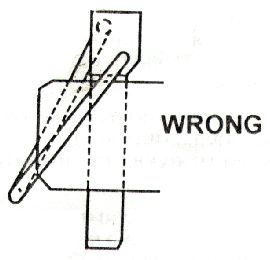
There's a right way and a wrong way to remove this stud.  It's just like tie-rod ends and should be removed with a tie rod end fork (also known as a pickle fork).  If you do suspension work you probably have one around and will be able to pop this stud off the swaybar with no trouble.  There is also a device that presses studs out, and that will also work with minimal carnage.

Even though I have restored several cars and have rebuilt several front ends, I have stuck with a more primitive approach - brute force.  The problem with this approach is that you are committing to discarding whatever you remove using this method.  You will seldom be able to use the part once removed.  So if you want to save the stock connectors, use the pickle fork or stud remover press.  If you want to chance it and risk ruining the stock connector, you can do what I did - thread the nut on to the top of the connector until it is flush with the top of the stud, flip the swaybar down so it is up against the front bumper, then wail on it with a 7 pound maul (BF-Hammer).  It took about 5 sharp raps with my well seasoned hammer to pop each stud from from the swaybar...  The nuts are pretty well toasted but they protected the studs on the connectors so I could reuse them with new nuts.

Suspension with connector removed

This is what the suspension on the drivers side looks like when the stock connector has been removed.

You have just completed the hard part!

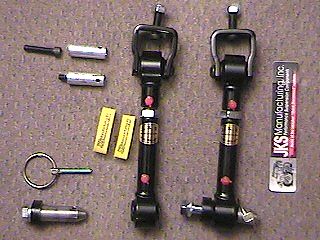
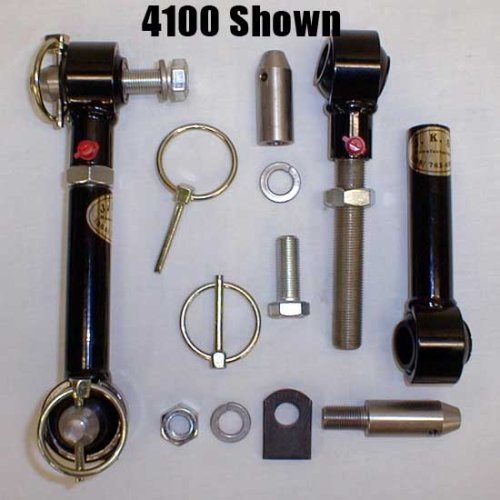
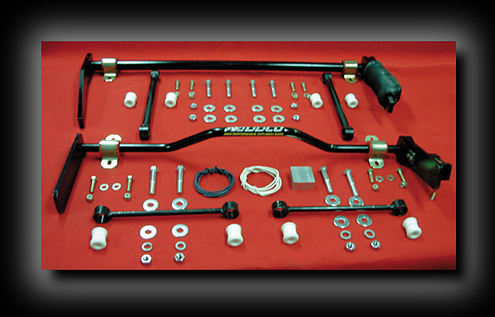
Here is the complete text of the JKS "Quick" Disconnects installation instructions I received (Model 2000).  Please consult the instructions supplied with your parts in the event that they supersede these:

- - - - - - - - - - - - - - - - - - - - - - - - - - - - - - - - - - - - - - - - - - - - - - - - -

PRODUCT SOLD FOR OFF ROAD USE ONLY!

INSTRUCTIONS ---- 2000, 2001, 2002 QD's

  1. Disassemble U-Strap from Top of Quick Disconnect by removing metric button head bolt.  Mount U-STRAP on top of swaybar using metric button head bolt and nut provided. NUT SHOULD BE ON TOP OF U-STRAP.  Do not attempt to install the U-Strap below the swaybar.  Use flat washers on bottom side of XJ swaybars only.  Do not use these flat washers on TJ applications.   Mount threaded leg of U-Strap inboard.  See Figure 2
    JKS Quick Disconnects - Figure 2
    [ppro comments: I followed this step as described and used BLUE Threadlock on the nut that holds the u-strap to the swaybar.]

WARNING!

U-Strap must be mounted on top of swaybar, NOT BELOW.  Flat washers are for XJ Cherokee and '93-'95 ZJ Grand Cherokee use only.

  1. Remove Click-Pin and Stainless Steel pin from bottom of Quick Disconnect.  Install Stainless Steel pin in OEM Axle Bracket.  Make sure Click Pin hole is horizontal to ground or close to it.  Do not remove plastic spacer from Stainless Steel pin.  [ppro comments: I used a nail that fit into the hole for the clevis pin, a piece of thick cloth, and some drop-jaw pliers to hold the Stainless Steel (S.S.) pin in the desired position while tightening the bolt.  I used BLUE Threadlock on the bolt to help keep the S.S. pin from coming loose.  The use of the nail helps to immobilize the S.S. pin without applying gripping pressure on it.  The pin fits very precisely in the disconnect so I did not want to mar it with plier marks.  And I did not want to spoil the Click Pins.   The nail was ruined but should be commended for serving so well...]

  2. Using Swaybar position chart (Figure 1) JKS Quick Disconnects - Figure 1 , determine what length your quick disconnect should be and adjust length accordingly.  Tighten jam nut only with both ends of the Quick Disconnect laying on a flat surface.  This will ensure that both bushing cradles remain parallel with one another.  Optimum swaybar position is plus or minus 3 degrees from 13 degress above horizontal.  [ppro comments:  I used the stock connector to determine the length of the "Quicker" Disconnects.  It turned out that with no lift, the "Quicker" Disconnect is completely closed up to its minimum length.]

  3. Re-install adjusted quick disconnect to u-strap using the metric button head bolt in step 1. (Figure 3 JKS Quick Disconnects - Figure 3
    Use [RED] LOCTITE on end of threads of metric bolt to ensure this bolt does not come loose.  Using a 6mm Allen Head Socket torque this 45mm cross bolt to 40 ft/lbs.  Make sure both sides are of equal length.  This can be fine tuned later of the Jeep does not sit level by making one side longer than the other. 

  4. b.   Simply slide the bottom bushing over the Stainless Steel pin (Step 2) and insert Click Pin.  This is how you will connect and disconnect.  [ppro comments:  It was REALLY easy to connect.  What did I expect?  The Jeep is parked in the driveway on level ground.  Still, this is promising...]

New

  1. NOTE:   Some XJ and ZJ owners cannot use the storage pin provided but will have to rely on plastic wire ties or rubber bands provided to hold the Quick Disconnects up out of the way.  Secure in such a way so tire does not rub the Quick Disconnect at full lock.  Note:  XJ, ZJ Owners with OEM front skid plate option can use both storage pins, simply drill side of skid plate and insert storage pin bolt using a nylock nut.

  2. TJ Owners.  Install the Storage Pins on both sides of frame by drilling frame with "F" drill bit and tapping holes with 5/16" 18 thread.  Make sure you install Storage Pins in such a location so Quick Disconnect will easily move to it without adjustment.  [ppro comments:  This was very straight forward.  I simply made my drift mark, carefully placed the "F" Bit (17/64"), and drilled with one hand while drizzling oil from my little oil can with the other.  I let the drill bit do the work and in a few minutes I went through.  The tap ended up not fitting the handle the the sales clerk selected for me (why do I let these people help me?) so I took a chance and ran the tap with my adjustable wrench.  I oiled the tap and the hole, put the tip of the tap in the hole, pressed in hard and slowly turned the tap about 1/12 of a turn.  Once it "bit" the hole, and took hold, I just turned it a little while pressing hard, backed it off the same amount, oiled, turned it a little further then back, repeating until it got easier and the tap started threading into the hold like a bolt.  I backed it out, cleaned the hole and the tap, oiled both, then ran the tap in like a bolt all the way to the end.  The threads were nice and clean.   I backed the tap out, cleaned the hole, put BLUE threadlock on the 5/16" bolt and the hole, then threaded the Storage Pin into place.  Piece 'o Cake.

tapping frame for storage pinstapping frame for storage pinsJKS Quicker Disconnects in Storage Position (drivers side)

  1. The Quick Disconnects do not come pre-greased.  Grease each unit after installation using common wheel bearing grease or equivalent.  [I took off the pretty little red caps that came covering the grease zerks, shot some grease in them, then replaced the pretty little caps]

Warning!!!!

2000 DO NOT EXCEED 9.375" CENTER TO CENTER BUSHING DISTANCE.
2001 DO NOT EXCEED 11.625" CENTER TO CENTER BUSHING DISTANCE.
2002 DO NOT EXCEED 7.125" CENTER TO CENTER BUSHING DISTANCE.
WARRANTY WILL BE VOID IF THESE MEASUREMENTS ARE NOT STRICTLY ADHERED TO.

ALWAYS DISCONNECT FOR OFFROAD USAGE!

CAUTION!

JKS Pins

Right Wrong

When properly installed, the ring on the lynch pin will "snap" against the shaft of the pin.

When put in backwards, the ring does not fit snugly against the shaft and may vibrate or fall out unexpectedly.


Note orientation of the pin head and hole for ring in relation to shaft.


JKS Quick Disconnects - Figure 1 JKS Quick Disconnects - Figure 2 JKS Quick Disconnects - Figure 3

Figure 1

Figure 2

Figure 3


Why? | Parts and Tools Needed | Installation | Additions | Update 10/27/04

Additions

Since installing my J.K.S. "Quicker" Disconnects, I have learned a little bit about them.  I recommend the following additions to your collection of "stuff":

pry bar - I carry a small pry bar to use when removing the disconnects.  While they are pretty easy to remove, with age they get a little harder to remove, and leverage against the side of them using a flat pry bar makes it really easy to do.

mini grease gun - I now carry a mini-grease gun that I bought at Wal*Mart for about $10.  It fits in my storage boxes and provides me with the ability to grease the disconnects before use which makes them easier to remove and replace.  Too often I was forgetting to grease them and got to the trail with some pretty sticky parts.

spare clevis pins - I lost several pins from the tire hitting the disconnect when stored on the pin mounted to the frame.  This is a pain so I got a dozen clevis pins from Tractor Supply Company for about 10 cents each.

clevis pin tether straps - In spite of carrying extra clevis pins, I still didn't like the idea of losing them.  Call me compulsive.  So I started thinking about what I might do to correct the problem.  I very quickly hit on the idea of putting a tether on the clevis pin so it could not get lost.  If it got knocked off, it would merely dangle until I noticed it or it was time to reconnect.  Next came the question of what to use that would be strong enough to stand the abuse? 

Clevis Pin Tether

I found the solution in a vinyl-clad, stainless steel, 24", 45-pound test fishing leader.  I simply tie-wrapped one to the top of each end of the sway bars, passed them through the clevis pin loop, and attached the leader to itself.  Now, when I am disconnecting, I don't have to keep track of the pins - I just pull them out and let them dangle, flip the connector up onto the storage pin and retrieve the pin, and put it in the hole.


Update 10/27/04

After three years of use, well documented trips, and of course all of the wear put on the connects while driving on the road (~80,000 miles), I decided it might be time to rebuild them.  The bushings had gotten a little bit deformed, though not as badly as I thought, once I removed them and cleaned them up.  I discovered one of the bushings had a split in it though it still worked fine and there was no looseness in my suspension.  They didn't really need to be serviced but with the opportunity presented by the multi-week stay in a repair shop after what turned out to be a relatively minor crash, it was the perfect time to remove them from the Jeep and send them in anyway.  I still have my factory ones for the possibility that I need connectors but hopefully these will be back in time.

I contacted J. K. S. Manufacturing to ask about getting the bushings and installing them myself on my floor press.  Jim told me that it was possible but that a special tool that shoe-horns the bushings into the connectors is recommended to prevent damage to the parts.  I decided that I'd rather not mess around trying to make something that might not work and packed up the disconnects and shipped them to be rebuilt.  The cost was cheaper than buying new units.

Here are some pictures of them after cleaning and before mailing them out.

Condition on 10/27/04 - Click to Enlarge

Condition on 10/27/04 - Click to Enlarge

Condition on 10/27/04Condition on 10/27/04Condition on 10/27/04Condition on 10/27/04Condition on 10/27/04Condition on 10/27/04


Why? | Parts and Tools Needed | Installation | Additions | Update 10/27/04


JKS Mfg., Inc.

Return to Jeep Specs Page

Shop for Jeep Toys and Books | See the Toy Jeeps | Off-Road Index 


Click or the [ BACK ] button on your browser to return to the previous page.

Photos, Layout and Design © 2001-2008 Paul M. Provencher All Rights Reserved.
Contents of this Web Site may not be used without written permission

Hit Counter Visitors since 11/23/01

Last Updated 02/09/2008 11:00:04 AM -0500

Home


Future indefinite...

Addco "ATB" (All Terrain Bar)

Addco All Terrain Bar System
Sway bar with remote control disconnect

Watch Addco for their in-cab controlled sway-bar quick disconnects (SEMA Show award winner for best new product - available(?) for TJ's.  Check here)

http://www.addco.net/

ADDCO Industries Inc.
P.O. Box 217
Linville, NC 28646-0217
(828)733-1561

Manufacturer of a full line of antisway bars, 1000-plus applications; supplier of anti-sway bars for cars, trucks, vans and SUVs, as well as supplier to ambulance and RV manufacturers; urethane bushings. 

sales@addcoindustries.com

Best New Off-Road/4-Wheel Drive Product and Best Engineered New Product: ADDCO Industries' All Terrain Bar Kit provides enhanced handling on road for Jeep TJ drivers and allows them to disconnect their sway bars easily for off-road driving.

Return to Jeep Specs Page

Shop for Jeep Toys and Books | See the Toy Jeeps | Off-Road Index 


Note:  We recommend the JKS "Quicker" Disconnect for the Wrangler TJ

- Listed on Amazon as the MORE 4100 Sway Bar "Quicker" Disconnect.


Click or the [ BACK ] button on your browser to return to the previous page.

Photos, Layout and Design © 2001-2008 Paul M. Provencher All Rights Reserved.
Contents of this Web Site may not be used without written permission

Home