Hi-Lift 60 Inch Jack, JackGuard, Installation and accessories

Hi-Lift Jack logo

Hi-Lift 60 Inch Jack
Jackguard and components


Hi-Lift Fix-It-Kit | Off-Road Base | Off-Road Jack Kit | Instructions | Maintenance

4X4 ICON 2000 - 2008 The DVD! - Click here for details!

4X4 ICON 2000 - 2008 The DVD!


One of the first things I learned surfing the web was that nearly everyone who goes off-road takes a Hi-Lift jack along with them.  I used to keep a long bumper jack with me when I went with my CJ-2A and even as bad as that jack was, it got me out of several binds.  So there was no doubt that I would get a Hi-Lift jack as one of my first pieces of off-road gear.  I decided to get all the trimmings and go for the 60-inch model since I was not expecting to get an electric winch anytime soon, and the extra length may come in handy if I have to manually winch myself using the jack.  Even after I got the electric winch, the Hi-Lift is still on my list of essential gear.  I never leave home without it.

My first mounting system consisted of a 4XRAC and Jack Protector cover.  I assembled the brackets to the roof rack with some additional hardware that I purchased.  This worked well for almost a year.  Then one day I was surfing the web and I discovered the JackGuard...

The Hi-Lift is great.  I have no doubt that this is an essential tool to have with you at all times.  But there is some sage advice about doing upgrades to your Jeep:  "Shop long and hard, ask lots of questions, and make sure you have evaluated all the options before you buy".   While this usually applies best to things like lift kits, and associated mods related to a well engineered lift, it can also apply to accessories too.

Jackguard on Wilderness Expedition Roof Rack

I found this Jack Case surfing the web by accident - it's more up my alley than the 4XRAC and Jack Protector case I bought and describe below... 

I mentioned it to my wife when she was asking about what I might want for Christmas.  She took note of the web site address and the next thing I knew, I had myself a new JackGuard, complete with the 60" extension, mounting brackets, and sundry items.  As you can see from the photos, it fits my design motif (Jeeze, that sounded yuppie...) and engineering requirements (Jeeze, that sounded geeky...) 


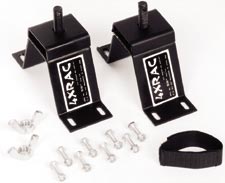
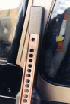
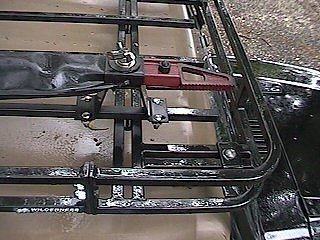
As soon as I had a free moment, I disassembled the 4XRAC and installed the JackGuard.  It was very simple.  First, I had to cut the end off the main part of the case so my 60" jack would fit in the case.  I just took out one of my wood handsaws and carefully trimmed off the very end.  Once I got the saw started it just went through nice and clean.

Clevis Pin and Rubber Washer

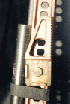
Next I installed the extension bit that covers the longer jack rail.  I just snapped it on.  Then I drilled out the hole for the retainer pin.  I drilled each side separately so that I would not end up with the holes out of alignment.
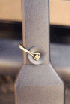
I had to move the clamp from the top of the jack all the way down to about the middle of the jack so the end of the jack will fit in the case.  I rotated the clamp around so that the flat side is bolted to the rail.   When I take the jack out to use, I will need to move the clamp out of the way.

Top of JackguardJack Clamp moved to allow use of Jackguard

Inserting Jack into Jackguard

The easiest way to get the jack into the case is to just stand it up and slide the case down over it.  Then adjust the case until you can insert the retaining pin through the hold provided and also through one of the holes on the jack.

Before putting the jack into the case, I lined up how I would attach it to the roof rack.  I moved the floor rail over a little so the JackGuard would clear other items mounted, and located the mounting bands so that I could remove the case from them without interference from the sides of the rack.   Once I was satisfied with the location, I bolted the two bands to the rail and slapped the JackGuard and case up on the roof.

Mounting Hardware on Roof RackMounting Hardware on Roof Rack

Base of JackguardJackguard on Wilderness Expedition Roof Rack
Rear view of Jackguard installationRear view of Jackguard installation

Jackguard during removal from roof rackJackguard during removal from roof rack
Jackguard on Wilderness Expedition Roof RackJackguard on Wilderness Expedition Roof Rack


It is an improvement on several counts:

  • It sits lower on the rack
  • It blends better with the other black containers
  • The jack base no longer rattles
  • The jack SHOULD be kept drier than before.


Hi-Lift Fix-It-Kit | Off-Road Base | Off-Road Jack Kit | Instructions | Maintenance


6/16/07  Jack Maintenance!

The Hi-Lift jack saw some use.  Indeed, if we had been alone, it would have been the only thing left offering hope of self recovery.  It has come in handy this way before so I have to take care of it. 

The Jack Guard case has protected it very well and even after a couple years of not being taken out, was not rusty and worked freely.  But since it got wet and muddy, it needed to be cleaned and lubricated before being stored again so that next time we need it, it will be ready.

This involved a number of steps. 

First the jack was hosed off to remove the chunks of mud. 

Next, a penetrating oil was sprayed on the jack to dislodge all the dirt, water and rust in the mechanisms.  This might seem like enough to call it done.  But this type of oil mostly evaporates and leaves no lubrication. 

So with the mechanisms cleaned and exercised quite a bit, I sprayed the penetrating oil one more time and then applied a very generous coating of spray-on lithium grease. 

Then I exercised the jack some more. 

When the jack was working flawlessly (this is after about a 1/2 hour of various steps and exercise up and down), I sprayed one more coating of lithium grease. 

By this time no more dirt or rust was coming out of the mechanisms.  I am certain it will be ready for the next use no matter how distant that may be.


Other items that come in handy:
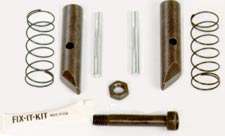


Hi-Lift Fix-It-Kit

I have the repair kit so that I would have it if and when I need it, no matter where that happens to be...

Hi-Lift Jack Fix-it Kit

Hi-Lift Fix-It-Kit | Off-Road Base | Off-Road Jack Kit | Instructions | Maintenance


Off-Road Base

Hi-Lift Jack Off-road Base

I got the Off-Road Jack Kit so I could use the jack as a come-along, and the Off-Road Base so it wouldn't sink out of sight in soft ground when used as a jack.

Hi-Lift Fix-It-Kit | Off-Road Base | Off-Road Jack Kit | Instructions | Maintenance


Off-Road Jack Kit  
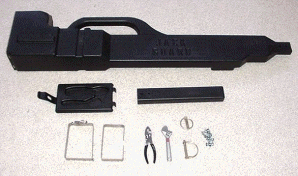
Off-Road Kit

Kit Includes:

  • 1 Custom Nose Attachment
  • 1 5/8" Shackle
  • 1 8ft. Tree Saver Strap
  • 1 Pair Hi-Lift Gloves
  • 1 Carrying Case

Off-road Kit
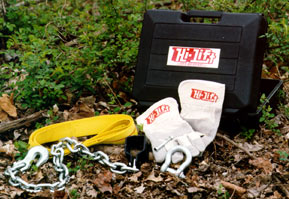
To this, I added the following items when I purchased my winch:
  • 2 3/4" D-shackles*
  • 2 16,000lb snatch blocks*
  • 1 20' 3/8" chain with hooks*
The 20-foot chain is for providing an anchoring point to boulders.  The snatch blocks are for pulls when high strength or shortened/angled cable setups are needed.  The D-shackles are used as an anchor point for the winch hook, attached to either the tree saver, bumper or the chain.  In addition, I carry two medium-sized quilted moving blankets for multiple uses, and to dampen cable whip if it should snap during a pull.  The gloves are required for handling the cable to prevent injury from loose cable strands.  The custom nose attachment is primarily intended for use with the Hi-Lift jack when used as a winch so it may not come into play for power winching.   The case consolidates all the items needed for winching or jacking operations.

Hi-Lift Fix-It-Kit | Off-Road Base | Off-Road Jack Kit | Instructions | Maintenance


Instructions
Although not an accessory in the strictest sense, I found that, not being born with built-in knowledge of safe and effective jack operation, I would need some instruction. 

I found a video from 4-Wheeling America and Bill Burke called Unstuck! that covers recovery methods and safety using a Hi-Lift Jack, winch, and nylon strap.  Since my kids love to watch videos and love to go 4-Wheeling, we sat and watched the tape over and over again.  I wanted to commit the advice to memory. 

They liked watching the recovery operations - something that they will probably be far away from in real life.  And the scenery of the video is tantalizing - shot in the Colorado mountains.  It's worth the few dollars it costs and is available on Bill Burke's site.  And before I hit the trail, I spent some time practicing in the back yard.

Unstuck!

Hi-Lift Fix-It-Kit | Off-Road Base | Off-Road Jack Kit | Instructions | Maintenance


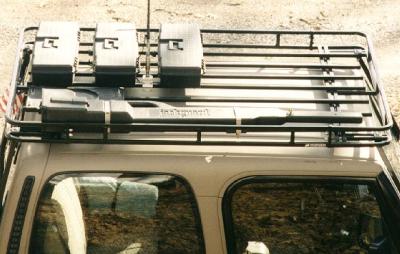
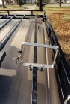
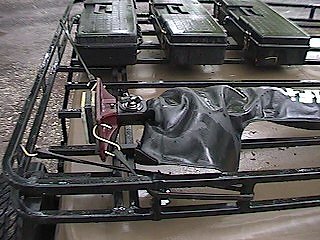
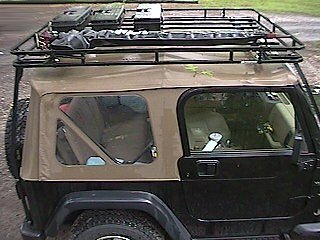
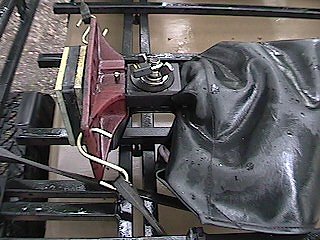
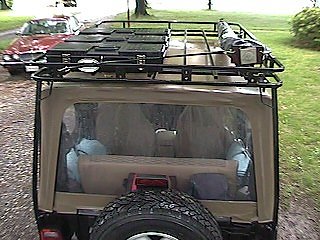
My First Mounting System

I first mounted my jack to the rack using the 4XRAC and covered it using the Jack Protector.   This system served me very well.  I never had any problems with it.   There were a couple things that did surface that ultimately convinced me to go with the Jackguard:

  • jack rattle
  • cover not water-tight
  • jack sat high over rack
  • appearance

Still, I would recommend this approach to anyone not terribly concerned with the issues listed above.  Here is how I did it and how it looked:


From the beginning I planned to mount the jack on my roof rack since I didn't much like the alternatives.  That meant getting some sort of mounting system.  I ordered the LocRAC but received instead the 4XRAC.  Rather than hassle with returning and swapping it, I went ahead and installed it.  I used some conduit brackets and   stainless steel hardware.  I replaced the cadmium plated wing nuts with stainless steel twins.  I bought two matched-key locks to prevent casual thieves from having too easy a job.

4XRAC

Hi-Lift Jack with 4XRAC mounting bracket

I splurged on the Jack Protector.  This was in part due to vanity - I wanted a cleaner look; and partly due to the belief that if the jack was kept protected it would rust less and be nice and clean when I need to use it.  I sprayed the moving parts with lots of lithium grease to keep them from rusting.  It worked well.

Jack Protector

I added to the mounting hardware some rubber washers that I found in the hardware store.  The thinking here is that they provide a shock mounting effect that allows the wing nuts to be nice and tight but still easy enough to remove without tools.   The rubber washers also protect the Jack Protector from the metal washers.

Hi-Lift Jack with 4XRAC mounting bracket

Once I got the whole thing situated I went for a test ride.  I was disappointed to find that the base and handle rattled badly.  I cured the handle rattle by using the supplied Velcro band to secure it against the jack body.

For the base, I used two heavy-duty rubber shock cords  to anchor it so that it will not move in any but the most extreme conditions.  This has worked well.  To prolong the life of the shock cords I treat them with Armor All and rotate them with others stored inside my roof rack-mounted storage boxes.

I affixed a large magnet to the base as a place to catch magnetic items when working on the trail and have loose bits that need to be retained.

Hi-Lift Jack with 4XRAC mounting bracket

Return to Build Sheet

Shop for Jeep Toys and Books | See the Toy Jeeps | Off-Road Index 


Click or the [ BACK ] button on your browser to return to the previous page.

Photos, Layout and Design © 2001-2008 Paul M. Provencher All Rights Reserved.
Contents of this Web Site may not be used without written permission

Hit Counter Visitors since 5/21/01

Last Updated 02/09/2008 10:52:05 AM -0500

Home