Sun Performance Heavy Duty Rocker Protection

Driver's Side

 Sun Performance Products

Installation Instructions

4X4 ICON 2000 - 2008 The DVD! - Click here for details!

4X4 ICON 2000 - 2008 The DVD!

Similar to Sun Performance Heavy Duty Rocker Protection (but not exactly...)

More below...

Right from the start I knew 
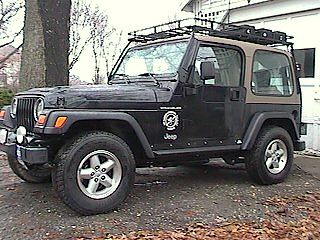
I wanted to get all kinds of body and chassis protection. When I had finished installing the roof rack, my next round of items ordered was the engine and gas tank skid plate items. I ran out of extra money right where I had listed Sun Performance Rocker Protection in my priorities. It would prove to be an unfortunate thing that I did not order and install them before I went off-road.

I went on several outings with no problems. I didn’t even hit my side steps. I knew it would just be a matter of time before the steps got whacked, but I wanted to wait as long as possible, thinking they offered some protection (they don’t) and that they were convenient for my wife and kids.

Well, finally the day came when I went on a moderately challenging trail and found myself off the not-so-beaten path, sitting seriously off camber in a boulder field. Behind me was another member of our group in a similar predicament. Between us was one of the regulars with a very nicely built Jeep (with the very rocker protection I am describing). Ahead was a nice guy with a Grand Cherokee®, who snatched me out.

Stuck

During the "extraction", my Jeep® received its first major trail modification: The passenger-side step was unceremoniously wiped off, and the support bars were "swept back". The rocker panel was reformed into something resembling a ruffles potato chip…

Aftermath - What Step?
Stuck

Somewhere along the way a hard branch also signed its initials deeply into the rear quarter panel. My wife looked on in horror and my kids (2 and 4) knew something was up but took it in stride. I had vertigo for the rest of the trip. I had fun on the trail but the price of that fun was a little too high. And it was bitter because I knew this would eventually happen. I had my side steps removed in a similar manner with my Willys many years ago, and it had countless gaffes in the rockers. 

It killed me that the very next piece of armor on my list was the rocker protection. I went home and took off the other step and was given a couple sets of steps that I am holding in reserve for when the Jeep® is returned to street guise for resale (Hey, I want a Rubicon, what can I say?)

Notwithstanding the pain of that outing, it was several months before I could actually afford to spend the money to buy the rocker panel protection. I went on many more trips, but was extremely lucky not to do any further damage to the passenger side. Somewhere along the way, someone drove their car under my drivers side and wrinkled my rocker on that side. So I was driving around for months with "whacked" rocker panels.

Driver's SideDriver's Side

Even though I like trail riding (the Jeep® has countless scratches to prove it), I am one who likes to keep a vehicle looking as nice as possible.  (I take a lot of crap from people because I show up for a ride with a fresh wax job and Armor-All on the tires...)  But I like to be ready for what a trail dishes out too.  I will take the "go-around" if an obstacle is too much, and avoid anything extreme that is optional, but you know how it goes – sometimes things go wrong and you find yourself in a predicament.

Driver's SideDriver's Side Rear

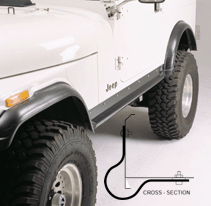
Anyway, circumstances finally came around to where I could afford to spend some money and the first thing I did was to fork over for the Sun Performance Heavy Duty Rocker Protection. I have seen them on the nicest Jeeps® around. They are never beaten up, never rusty, never dented, and they have a terrific fit and finish. And seeing first hand what these Jeeps go through, I know they aren’t being babied. The rockers are one of a few such products that cost about the same amount of money, but for me, these were the ones.

Driver's Side FrontDriver's Side Rear

The package they were shipped in ignored what was going to happen to these rails on the trail. They were packed like they were going on a show car!  And for that I am very grateful. For even though I know what they are going to look like after the first time I use them to pivot over a mogul or against a rock, I want to be the one doing the damage, not the postman. And these babies are heavy. With this addition, along with all the other steel that I have added to the Jeep®, I have finally convinced myself that some heavy duty springs are NEXT on my list of mods, but I digress…(I did them two weeks later.)

Driver's SideDriver's Side

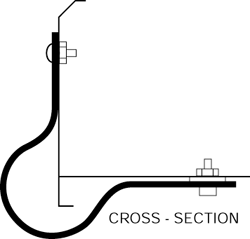
The installation is incredibly easy. Well, once you get past drilling 16 holes into the side of your body, it’s easy… I read the instructions (in black below) and decided to diverge slightly from them in order to do a couple things I wanted to do:

  • add lock washers
  • paint the holes to prevent rust
  • drill the holes in a different sequence for a tighter fit

I have annotated the original instructions below with my comments in bold blue text following my initials (ppro).

Passenger SidePassenger SidePassenger Side FrontPassenger Side

 These instructions are reproduced here exactly as they are found in the package with the rockers.  Be sure to refer to YOUR instructions if you buy these because the product or instructions may change, making what I did wrong for you.


Instructions for installation reproduced without permission. 
Please refer to your instructions for the latest information from Sun Performance Products.

INSTALLATION INSTRUCTIONS

For Part #TJP007

Heavy Duty Rocker Protection

Cross Section

READ THESE INSTRUCTIONS COMPLETELY BEFORE INSTALLATION


Parts List: 10 pcs. ¼" X ¾" Button Head Socket Screws (Stainless)
10 ¼" Hex Nuts
2 ¼" X 1" Button Head Socket Screws (Stainless)
2 ¼" Rubber Well Nuts
4 5/16" X 2" Hex Bolts
4 5/16" Hex Nuts
10 ¼" X 1 ½" Fender Washers
6 5/16" X 1 ½" Fender Washers
4 Aluminum Spacers
10 ¼" lock washers (Stainless) (not included with kit)


  1. Remove the fender flare extension from the rear of the front fender flare. This flare extension is held in place by three small bolts that can be accessed from inside the flare. Thoroughly clean the lower edge of the body tub.

    ppro: This is pretty easy. It goes faster with a socket for two of the bolts. The third requires a ratchet box-end, box end, or plain old adjustable wrench. Try not to swear too much.
  2. You may want to put a strip of electrical tape on the inside upper edge of the rocker guard to prevent scratching the vehicles paint during positioning and installation.

    ppro: My rockers were so scratched up the tape would have been overkill. If you still have nice rockers, you probably want to do this.
  3. The front of the rocker panel protector is the narrow end.

    ppro: 
    Underside (Passenger Side) Underside (Passenger Side)
    wide end narrow end

    The underside of the protector actually follows the shape of the floor pan. Once you test fit it up there you will notice the part that goes under the rocker will match up nice if you have it on the right side.

  4. When the rocker is in position, two of the aluminum spacers should be located between the rocker and the underside of the vehicle. These spacers can be taped in position on the rocker during positioning.

    ppro: I didn’t bother with the tape. I just laid them on the rocker protector when it was almost all the way up to the floor, making sure they were in about the correct location (lined up with the holes for the bolts that go through them)
  5. Position the New Rocker Protection against the side of the vehicle as high as possible. The part can be held in position with a floor jack or strong helper. Check to see that there is nothing preventing the part from being positioned in the full upward position. (small metal tabs in the bottom of the body can be bent upwards to allow for a tighter fit.

    ppro: I don’t know about "strong helper"… I used a commercial floor jack with a piece of wood on it to protect the finish of the rocker protector. When the floor jack was about 3 inches from the rocker, I balanced the rocker protector on the wood, placed the aluminum spacers on the rocker protector, and then got the rocker protector in position. You have to get it past your fender well flares a little bit but that is no big deal.

    I checked the aluminum spacers to be sure they were still in position. I jacked it up enough that the weight of the Jeep started to come off the springs, just to make sure that the protector was really up against the body. Due to a couple of off-road incidents, the bottom edge of my rocker panel was already a little "wavy" so I had to straighten them.

    I put a piece of wood over the outside body panel and used some drop-jaw pliers to bend the panel back into shape. The wood gave me a reference point for the panel being flush and also prevented unnecessary tool marks on the body. I bent the tabs up out of the way. When I did, I noticed that the paint flaked off. So I used some Herculiner to paint the edge to prevent rust and for what it’s worth, to prevent more paint damage. Once I was satisfied with the body panel, I put the protector back up with the floor jack. I once again made sure the aluminum spacers were in place.
  6. Once you are completely satisfied with the positioning of the rocker protector, use a pencil or marker to mark the holes on the side as well as on the underside of the body tub.

    ppro: I didn’t do this. My Jeep is black and a pencil or marker would not work. I could have used a center punch but I didn’t. Read on…
  7. After marking the holes, remove the rocker protector and set it out of the way.

    ppro: I didn’t do this. I left the rocker in place on the floor jack.
  8. Use a drill bit that is slightly larger than the bolts provided, to drill holes through the side and underside of the body tub. (Bolt size: ¼" Button Head on the vehicle side, 5/16" Hex underneath, ½" for rubber well nuts, below Jeep® logo.

    ppro: I selected the correct drill bit and drilled the side holes, right through the existing holes in the protector, making sure not to graze the protector. In this way I was able to get all the holes lined up precisely without messing around with marking the holes and getting it wrong.

    I didn’t drill the two holes in the floor yet. I wanted to bolt the rocker protector to the body so it was nice and tight before drilling the holes in the floor. My reasoning was that if the rocker is tight against the body, the floor holes will be a little further in and allow an even tighter fit of the protector against the body.

    I took a couple minutes during the drilling to paint the holes and surrounding areas with Herculiner. I didn’t wait for it to dry since I wanted it to "flow" around the fender washer and bolt, providing some sealing action. It may also help to keep the fasteners from coming loose. It will look like hell if I take the protector off, but then so will the dents that the protector is covering so… I sprayed, from behind, some more Herculiner on the INSIDE of the holes on the rocker protector to cover any nicks that I might have made with the drill, and to provide some sealing where the bolts go through the body.
  9. Make sure the holes below the Jeep® logo have been enlarged to fit the rubber well nut, you will use the two longer button head bolts (1") for the well nut.

    ppro: I removed the rocker protector from the body, changed the drill bit to the ½" bit and enlarged the one hole below the Jeep® logo.

  10. Carefully insert the rubber well nut into the enlarged holes below the Jeep® . Use caution when doing this to prevent pushing the rubber well nut through the hole.

    ppro: I drilled the hole using a ½" bit even though the directions said to use one larger than the nut. I test fit the rubber well nut and it was a nice smooth fit. It did not make sense to make THIS hole oversized so I left it at that. I left the rubber well nut in place.
  11. Re-position the Rocker Protector and install the part using the ( ¾") stainless steel button head bolts with the fender washers and nuts on the inside. Remember to use the longer (1") button head bolts for the hole below the Jeep® logo.


    ppro: This was easy. I added ¼" stainless steel lock washers to all the fasteners (on the inside of course) except the rubber well nut. That gave me a better feeling that the nuts would not get loose from vibration. I tightened the bolts working out from the center bolt, alternating sides until all bolts were tight. This allows any waviness that might result to be "worked out". It also tightens the rocker protector down for the flattest fit. Kind of like the way you alternate lug nuts when you mount a wheel on the hub.  I also painted the inside with Herculiner to protect them from rust, keep them from getting loose, and to tone down their presence (black blends better than shiny metal)

  12. The 2" hex bolts can be inserted from the bottom up and fasten inside the vehicle using fender washers and nuts provided. Trim off any excess of the 2" bolts inside the vehicle using a grinder or hacksaw.

    ppro: Once all the body-side bolts were tightened, I moved my attention to drilling the two holes in the floor. The aluminum spacers were already up between the rocker protector and the floor so all I had to do was ease them into position, lined up with the hole on the protector, by tapping on them with something. I changed to the correct bit (5/16") and drilled the holes. Of course I moved the carpet and the mats out of the way so that I did not have matching holes in them. Once the holes were drilled, I painted them with Herculiner and then bolted the protector down. 

  13. End of story. Repeat the steps for the other side and you are done.

Sun Performance Rockers
Photo © Sun Performance Products

SUN PERFORMANCE PRODUCTS

17 Musick Irvine, Ca 92618

(949) 588-8567 FAX (949) 588-0142

Return to Jeep Specs

Shop for Jeep Toys and Books | See the Toy Jeeps | Off-Road Index 


Click or the [ BACK ] button on your browser to return to the previous page.

Photos (except as noted), Layout and Design © 2002-2008 Paul M. Provencher All Rights Reserved.
Contents of this Web Site may not be used without written permission

Instructions for installation reproduced without permission. 
Please refer to your instructions for the latest information from Sun Performance Products.

Hit Counter Visitors since 1/31/02

Last Updated 02/09/2008 10:46:04 AM -0500

Home