![]()
![]()
I really held out a long time before deciding to upgrade or change my springs. Anyone who goes out with groups knows the incredible peer pressure to "lift" your vehicle and put large tires on. At my age, most, although not all, of this peer pressure is pretty easy to resist. I know there are real benefits to larger tires and lifted suspension. But I also know the domino effect that it sets in motion.
First you just want large tires. But in order to get them you need more clearance. Then you find out it affects engine RPM, so to correct that, you need to change your differential gearing. And the extra weight can cause failures in weak factory axles, so you need to upgrade them as well. And while you're at it, you find out that that rear drive shaft arrangement is going to need attention so it will not vibrate with the new lift. And your wide tires are going to look better on new wheels. And the new wheels are going to make everything stick out so you need new flares to keep the body clean and keep the cops happy. And since you're going to be re-gearing, might as well go get some lockers installed while you're in there... And then some people decide that more wasn't enough and start over again.
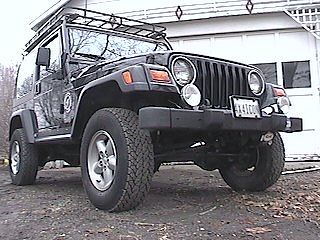
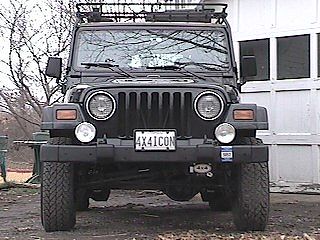
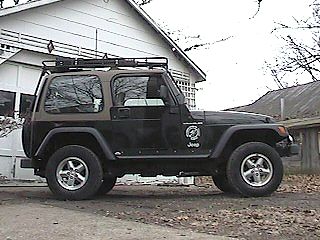
The next thing you know, you've dropped several thousand dollars, your Jeep probably isn't much fun on tame trails, and you can't really drive it to work anymore. Heaven forbid you get careless and go on some of those off-camber trails you drove when it was "little" - you might tip over easier. All in all, I weighed the options and for me, the chain reaction would be unavoidable if I went to a larger tire. I don't like to do things halfway, and I know I would not be happy if I lost engine performance by just installing a larger tire and "faking it" with a cheap lift and nothing else. I would have to get gears and everything else. It would end eventually but it would not be cheap. So I never seriously considered a lift or different tires beyond perhaps a 31" x 10-ish AT of some sort. What I didn't think about as I added more and more things to my Jeep, was the accumulation of weight that eventually made me realize that I had to do something. The straw that broke the camel's back was the day I put the hard top back on for the winter. That extra 140 pounds really made itself felt. And as if that wasn't enough, when I installed the heavy duty rocker protection, it was clear that I needed to do something. It bottomed out if I had anyone at all with me, and wallowed like a Caddy. I thought I might put off the inevitable and just get some spring spacers to recover some height, but before I could seriously act on that, chance conversation with two friends let me in a different direction. My friend Carl mentioned that Old Man EMU made springs that were described more in terms of vehicle load weights than lift heights. That was interesting because most of the lift kits I read about never really say too much about load weight. All they talk about is inches above stock ride height. So I looked at the literature and found myself wanting Old Man EMU springs, shocks, and the rest of it. I contacted ARB USA and asked which products would work for me with my loading - about 400 pounds of gear, not counting my family and any luggage we might happen to carry along. They wrote back and told me:
This is quite a laundry list of items! So I shopped around and found a place that had everything and a good price to boot. And then I sat on it. It is a pretty expensive proposition and I decided to "save up" for it. That's when I talked with Mike. It turned out that he had the springs I need and was willing to sell them for a decent price. I pushed it around (for about 2/10ths of a second) - I would save some good money, so I decided to go ahead and get the springs. I decided to install them as well, even though I really do need to get the shocks and some of the other stuff for it to be "done". The worst that can happen is they don't work well alone and I either take them back off and wait, or I go ahead and break down and get the other stuff right away. In the mean time I have acquired some gas shocks that come as part of the 30-inch factory wheel package and I will use these until they need to be replaced (I upgraded the shocks). |
|
|
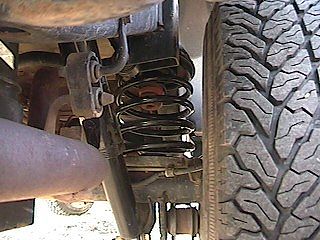
Spring Installation This should only take a couple hours. I have installed springs on my Volvo's and it's pretty easy. Once the springs are installed, I will need to make some checks to make sure it is OK to drive without new brake lines, shocks, etc. I also want to measure the before and after height to see how much "lift" I get. I can live with going an inch or so above stock. But if it gets much more than than, all the other things that to enter the picture (drive line angle, roll center, etc.) and I might have to rethink this. So with that simplistic expectation, I made plans to install the springs on a Saturday morning. The weather was great, and the temperature (for February) was very mild. The installation is actually pretty simple. I wanted to do a detailed installation guide but really, by the time we dug into the work and were doing it, it went so fast we didn't bother to stop and take pictures. Front Springs and Shocks.
Just disconnect the sway bar. If you are putting on springs and you don't have quick disconnects already, you might be getting started with the wrong things first, but to each his own. I simply disconnected my J.K.S. "Quicker" Disconnects and stored them on the pegs bolted to my frame. Next, with the Jeep in gear and the parking brake set, I put a floor jack under the differential. I loosened the lug nuts on the drivers side wheel, then jacked the Jeep up in the air. I put rigid jack stands under the frame just in front of the transfer case skid plate. Then I lowered the floor jack. I removed the drivers side wheel and set it aside.
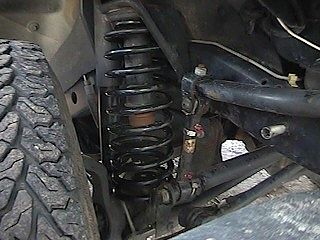
With access to the springs made easy, I next disconnected the shock. Two bolts on the bottom and one on top. Piece of cake. I installed the top of the new shock and left the bottom disconnected. Next I placed the floor jack underneath the mounting point where the lower control arm bolts to the axle tube. I raised the Jeep up until the passenger side wheel was off the ground. This compressed the drivers side spring as much as possible. Somewhere along the way I removed the retainer tab that anchors the bottom end of the drivers side coil.
Now here is where people take different approaches. Some people jump and cuss and pry and cry. I just used some borrowed spring compressors (Thanks Gary!) and attached them while the springs were compressed, making it easier to put them on. Then I carefully let the floor jack down and the drivers side of the axle dropped far enough to allow me to remove the spring with ease. We removed the spring compressor and attached it to the new spring. We compressed the spring until it would fit into the space without any trouble.
I should note at this time that the Old Man EMU springs are made for specific corners of the vehicle. Each spring is slightly different and must occupy a certain position on the Jeep. When I first looked at them it was somewhat disconcerting to see that the two rear springs were different sizes, and so were the front although less obviously so. As it turns out, the taller of the two rear springs was for the right side (passenger side in USA) and the taller of the two front springs goes on the drivers side (the left in the USA). The front drivers side spring was marked with a piece of paper tape with the letters "DS" on it. The rest of the springs are simply marked with the manufacturer name and part number. Anyway, the shock was reconnected at the bottom. The spring coil was positioned so that the end of the lower winding butts up against the provided depression in the spring perch, and the anchor tab was reinstalled. The top of the spring was placed in the provided location at the top of the suspension tower. The same basic procedure was followed for the passenger side front spring. I noted that there was no lower spring anchor tab, and indeed, the holes on the suspension were not even threaded, so I suspect the factory didn't install one. I'm not sure if that was an oversight or if it was by design. Rear Springs and Shocks.
The rear was much the same procedure as the front. I removed both tires while supporting the Jeep with Jack stands, after jacking it up with the floor jack under the differential.
Next, I supported the weight of the differential with the floor jack, and the weight of the Jeep on jack stands, and disconnected the rear sway bars and shocks. The upper shock mounting points were real pains. The first one even more so until I woke up to the fact that the shock, once disconnected on the bottom, pushes out of the way easily to make access to the bolts a lot easier. Still, I would rate removing the rear shocks the hardest part of this job (I already suffered through removing the factory front sway bar connectors separately, which was harder than the shocks during this work.)
Once the sway bar connectors and shocks were removed from the rear, it was very easy to remove the rear springs without using the spring compressors. We simply jacked the Jeep up high enough to get a jack stand under the very end of the axle tube on one side, and lowered the Jeep enough to allow the spring to lift right out on the other side. We used the spring compressors to squeeze the new springs enough to get them into position, then released the tension, lifted the rear end moved the jack stand to the other side and repeated the steps. With both springs in position, we installed the new shocks and reconnected the sway bar. Once the wheels were back in place, we raised up the Jeep, removed the jack stands, and lowered it to the ground. Summary
I found this very easy to do, but I should add that I have replaced coil springs on Volvo 122's, Volvo 1800's,and Jaguar E-Types. It's basically the same process in all cases, although I must say that the I.F.S. front ends with unequal A-arms are harder, and the Jaguar rear I.R.S. are another story altogether. The point being that if you have done coil springs before, you will find this very easy. If you haven't done it before, work safely and think about what you're doing, and you too will find this easy.
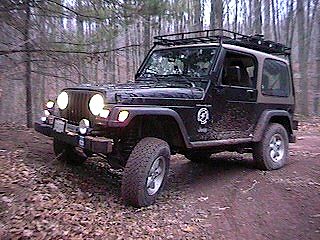
A couple of decisions I made will not work for everyone. My Jeep has about 400 pounds of equipment that is always on board. Half of that weight is accounted for in the skid plate protection and side panel protection that I installed. More of that weight is in the roof rack, tools and supplies that I always have on board. Consequently, my net height gain was somewhere around 1.5 inches.
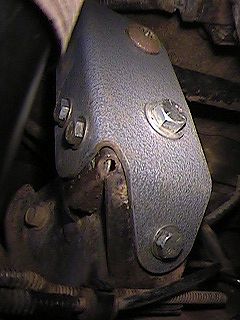
Some driving around revealed that there was no drive line vibration, so I did not use a transfer case lowering kit. The rear axle was slightly pulled to the passenger side so I decided that I would need to install the track bar relocating bracket (supplied with the kit). When I removed my hardtop, I still did not have any drive line vibration, so I think I will be OK without the transfer case drop kit. Track Bar Relocation Bracket I put off installing the bracket for several reasons. First, it was late when we got the springs in so I figured I could do it the next day. A few days later when I went back, I found that I could not fit my Torx bit socket between the track bar and the gas tank skid plate with the Jeep on the ground.
And in order to install the bracket once I did get the bolt out, I would have to drill four holes. So I put it off for a while. Finally, I got around to scheduling an alignment when I noticed (DUH) that the passenger-side front tire was showing signs of premature, uneven wear. Not bad enough to ruin the tire but it could not be ignored any longer. And since the rear axle was not quite centered, I figured I had best install the relocation bracket BEFORE the front end alignment so that things would be as lined up as possible. Ideally, I should get an adjustable front track rod but this will have to wait... Installing the Bracket
Lower Shock Mount and Sway bar connector
Basically, the relocation bracket bolts on to the old bracket mount using five bolts. The track bar on that end is raised up toward the body about two inches. This puts the angles back to the original positions so that the rear axle is centered under the body. In order to attach the bracket, four holes must be drilled. Two of the holes are located where the plastic snap-on clips hold a plastic cover onto the old bracket. These two holes are enlarged to accommodate the bolts used to hold on the new bracket. Two other holes are drilled from scratch on the side of the old bracket. I temporarily mounted the new bracket after enlarging the existing holes, and used the new bracket as a template for drilling the new holes.
Installed Track bar relocation brack (top bolt not visible) I am greatly understating the amount of cussing and fussing that I did during this process. It took me several minutes of trial and error to figure out to raise the passenger side wheel and lower the drivers side hub to get to the track rod bolt. I had to get a breaker bar for my 3/8 socket drive because the handle was so short I could not get a good purchase on the foocockta T55 bolt. The hole drilling on the bottom most hole and two side holes was easy with the shock and springs out of the way, but the top hole was a real pain because once the bracket was attached, it did not line up perfectly with the existing hole that I had enlarged. No amount of loosening of the other bolts would get it to line up so I had to enlarge it enough to get the bolt to go in. Not to mention that drilling down on top of the existing bracket in a very confined space, was not real easy to get the drill in there. Once the holes were all drilled, I started bolting the bracket to the old mount. The side bolts were the easiest because the nuts inside were fairly accessible, even though I did drop the washers and nuts and had to retrieve them from the bottom of the bracket (not easy but not impossible). Next in difficulty was the bottom bolt and nut, for some reason slightly larger than the others. The way it fits inside the bottom of the old bracket, you can just barely get an open end (9/16) on the nut to hold it while you tighten the bolt. Then the top nut. This one is probably responsible for my condemnation to Hell because I called it every name in the book. It turns out that the bolt must be inserted from the inside and the nut placed outside the old and new brackets, on top, so that it does not interfere with the final bolt that replaces the old retaining bolt. Finally I was able to get it started and tightened down. And lastly, the large bolt, sleeve, washers and nut that take the place of the old track bar and track bar bolt. The factory bolt is held with a nut that has a long tab on it, making it very easy to get started and tighten with only that cursed T55 socket. The kit comes with another nut and bolt (not the same thread size) that is just slightly larger than the original. At first, without any directions to reference, I thought the factory bolt went in the old hole since that seems to make sense, especially because of how hard it is to hold that nut. WRONG. The replacement bolt and nut go in the old track bar retaining hole, through the supplied sleeve. The replacement bolt is too large to fit through the track rod end. I managed to get it put together using the old retainer on the track rod end through the new track rod relocation bracket, with the long tab on the nut flipped all the way towards the passenger side out of the way.
I have read many accounts about the pain and suffering associated with lining up the track bar holes when it's time to put it back together. I am here to tell you that I never had a problem with that working on my Volvo 122's and 1800's. It's the same exact layout and has the same type of assembly considerations. Basically, my approach with those cars was to attach the nut and bolt on the passenger side of the track bar, but leave it loose. Then raise the drivers side hub using the floor jack under the differential until the holes in the track rod end line up with the bracket. I hoped it would work with the Jeep... Once I had replaced the spring to its rightful spot on the axle, and started the track bar retaining bolt on the passenger side, I jacked up the rear end until the track bar was lined up with the bracket. It was stupid easy. I put the bolt through and attached the nut. That was too easy. After all the crap with the bracket mounting, I deserve a break, huh? Then I reattached the sway bar and shock, tightened everything up and called it done. During the assembly of the nuts and bolts, I used anti-seize compound on the sway bar and shock, and Loc-Tite (blue) on the bolts that hold the new track bar bracket, even though they have nylock nuts. I put the road wheel back on the drivers side rear (like you didn't know which one...), placed a ramp under that wheel, and let the Jeep off the floor jack. Then I drove the Jeep off the ramp. The rear end was nicely centered under the body. Done.
Now, all I need is shocks and an alignment with a slight steering wheel re-centering. That is scheduled for a day or two from now. (Done)
The difference is like night and day. This took care of my nose-dive on hard stops, my nose lift on hard acceleration; I no longer bottom out with two kids, a wife, and some luggage loaded. The suspension doesn't have a soft feel like my bone stock system - but it is by no means harsh. When I hit a bump, it absorbs it with no reverberation. In short, this system accomplished my goal of supporting the added weight of my setup, and produced only a minimal lift. I have reserve weight capacity in the front for a winch. For now, my boy, "Wooly", will just have to do for ballast instead of a big bad WARN winch!
|
Return to Jeep Specs Page
Shop for Jeep Toys and Books | See the Toy Jeeps | Off-Road Index
Photos, Layout and
Design © 2002-2008 Paul M. Provencher All Rights
Reserved.
Contents of this Web Site may not be used without written permission
Visitors since 2/9/01
Last Updated 02/09/2008 10:42:37 AM -0500


