![]()
Need | Design | Installation | Testing / Adjustments | Compressor Info | Oasis Trailhead automatic tire deflators | Misc. small tools
![]()
| The Need | |
| When I started looking
at what I wanted on the Jeep, I found that one of the items on everyone's list was
on-board air. That took me down the road of looking at the ARB & Quick Air
systems, and the A/C Compressor conversions. Oh yes, also the CO2 Power Tank. All I can say is "OUCH". I freely admit that at this time I am not in the same league as anyone who really needs a solution like any of these fine systems. I don't have air lockers, air horns, and do not expect to be running air tools on the trail. At first, didn't think I would air down that much so I opted for a high-capacity compressor that does a good job of airing up four tires from about 20lbs to 35lbs in about 20 minutes. That worked OK to start out. |
|
Need | Design | Installation | Testing / Adjustments | Compressor Info | Oasis Trailhead automatic tire deflators | Misc. small tools
| Design | |
|
After a while, that 20
minute air-up time started to get old. Sometimes we'd just drive to a gas station
and get it over with. But only if the drive wasn't too far. That left us
standing around, sometimes for an hour if there were others who needed air. But even
without getting a hot rod compressor, I still thought there had to be a way to cut this
time down some, and provide for the possibility that I might have to reseat a bead on the
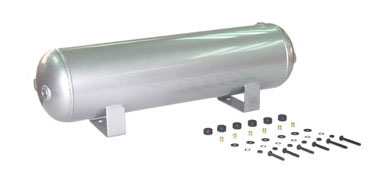
trail. Of course, that meant getting an air tank. I finally managed to find a tank, made by Viair, that was reasonably inexpensive, small enough, and with a good maximum pressure capacity (150 psi).
|
| As for the compressor, this meant that I had to make a decision. Do I want to go for broke and get the QuickAir or something like it? I was not on some sort of budget, I would just go out and get it and be done with it. But I still don't know if I want to drop 3 bills for an air compressor. I decided that I would try something that I have not seen yet: Install the air tank, run lines for air hose at the front and rear of my Jeep, and fit the air tank so that I can fill it at the gas station, at home using my large shop compressor, or using my portable compressor that I bought in the first place. | |
| I can hear
you now. "What an idiot, those little compressors aren't worth a
damn." Or "It might work but it will take forever to fill up the tank with
one of those little compressors." And "That might work OK but you'll only
get one tired filled up..." Well, maybe. But I have found that this interdynamics compressor seems to keep up with the little ARB compressor that lots of folks have. If I hook it up to an air tank, I should be able to have a sufficient reserve of air to get at LEAST two tires aired up just using the tank. So at the very worst, I will save 10 minutes every time I air up. If I am lucky, I might save more time if the air tank gets me through all four tires. I figured it was worth the experiment. |
|
| The portable compressor to fills up the air tank. It can run for 8 hours continuously. It can pump at up to 275 psi. So if I am filling a tank up to about 125~140 psi, it should be up to the job. (Once I got the tank, I tried it, and sure enough, even the interdynamics compressor can get it up to pressure.) I can run the compressor while I am on the trail if the tank is not full, so when we get done riding, the tank will be ready to use. If this doesn't work, what have I lost? I have the compressor already anyway. I'd just save a little more money and buy the big, bad compressor and finish the install. | |
|
So with that
reasoning, I ordered the tank. And as "luck" would have it, my local Farm
& Country store was going out of business (actually, it isn't such good news - they
have all the kinds of stuff that a suburban hardware store wouldn't think of carrying...)
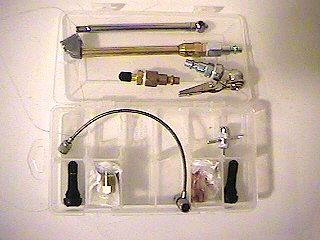
All of the compressor accessories were marked down 30%. So I bought several
items:
|
| So I went
home fat and happy thinking all I needed to do was go get some 1/4" NPT fittings,
some air hose and clamps, and a couple quick connects for the air chuck and tank valve,
and I would be good to go... So I went to, er, Home Depot. I won't turn this project write-up into a slam against Home Depot but let's just say that it was a mess, and it was pretty hard to find what I was looking for. I tried another one (Germantown) and found a much more organized and useful selection of items. I located someone there who really did know their stuff. I showed him my engineering drawings (sketch on some copier paper) for the system and told him the specs. With that he told me that I did not want to use rubber hose and hose clamps. Instead he showed me 3/8" copper tubing and compression fittings. This made sense to me so I revised my plan accordingly. |
|
| This presented a few new challenges. Instead of just running some rubber hose, I needed to start thinking about fittings. I wanted the installation to be professional, clean, and reliable. I considered how I was going to access the quick connects. I have seen set-ups with the quick connect mounted in the wheel well on the frame. This solution has the problem of being located in one of the dirtiest places on the vehicle. It will get fouled by all kinds of junk and probably be difficult to use at the end of the trail. Not to mention that the last thing I want to do is reach into a muddy wheel well to hook up my air hose. So that idea was a non-starter. | |
| Then I started thinking about mounting the connectors under the driver and passenger doors. This would provide easy access to the quick connect, and make it easy to reach the tires on one side at a time. The only problem with this location is finding a mounting point that will prevent the quick connect from getting dirty, and even more important, keep it from getting broken on a rock or something like that. Once again, this looks like it will not work. | |
|
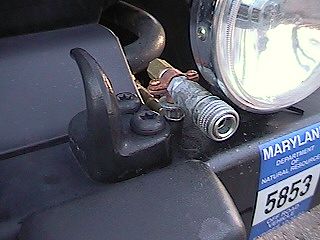
I found another
solution showing the quick connect mounted to a front-bumper mounted winch. And the
quick connect was covered with a vinyl leg tip to keep the junk from getting into it.
This looks like a pretty good solution except that I don't (yet) have a winch.
But I should be able to find someplace on my front end that I can anchor the quick
connect, so this is where I put it. I even found the leg tips that fit snugly on my
quick connect!
|
| Since I don't want a long coil of air hose, I mounted two quick connects - one at each end of the Jeep. I put the rear quick connect on the bumper, centered below the spare tire. Since I use my bumper to climb up to reach things on my rack, I wanted the connector to be out of the way. If I go to larger tires, this will have to be modified since there is already little space. | |
|
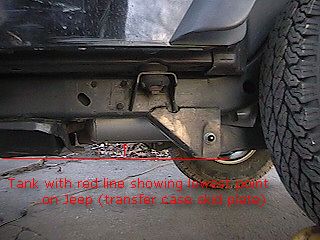
Most of the on-board
air write-ups describe the location for the air tank. There are three locations that
seem to be favored by most people using the a tank like mine:
The tank above the rear end is prone to getting whacked by the differential. Since I spend a fair amount of time on my bump stops, I don't think this location is an option for me with my heavy, stock height, Jeep. The under-hood location might be a good option but it looks like a lot of trouble and the tank ends up being in the way for a couple of items that will need to be accessed once in a while. So this doesn't look very attractive. This leaves the space next to the frame under the driver's seat. A quick test fit shows that the tank will fit there and hangs down about as much as the muffler on the other side. Since I have not yet hit the muffler, and since the frame rail still looks pretty unscathed, I think the tank will be fairly safe in this location. |
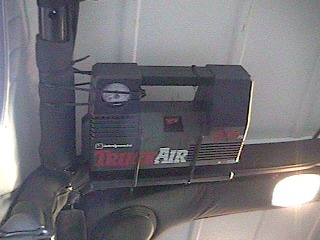
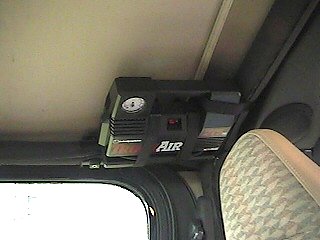
I have been storing my compressor using nylon straps, tying it to the roll-bar above the passenger seat. This has worked well even though it was a pain to tie it back up after I use it. In fact this is another reason for the air tank. I figured if I had a tank with external connections, I could leave the compressor in the Jeep, and mount it securely.
|
|
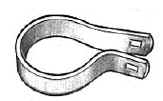
So I acquired a couple chain link fence parts, "Tension bands", to use to mount the compressor in the same location but a little more permanently since I will generally not need to remove it from the Jeep.
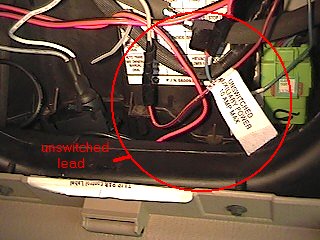
I ran the power plug under the roll bar padding and down through the an opening in the corner of the dash and into a second accessory plug that I added in the same fashion as the one installed for the GPS, using the Switched lead. This will keep me from running the compressor with the Jeep turned off. |
|
|
In order to be able to
fill the air tank using the portable compressor, I needed to run a line into the passenger
compartment. I used a regular schraeder valve just like the ones on the wheel to
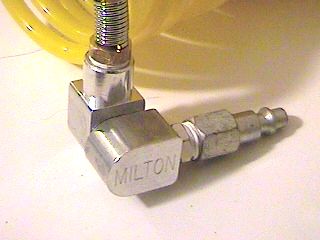
connect the compressor hose to the air tank line. I purchased a manifold that allows
for three fittings. On this I installed
The hose from the compressor simply clamps onto the valve. When I am done filling the tank using this method, I disconnect the compressor hose.
|
| Fittings | |
In order to fill the tank using my shop compressor or a gas station hose, I attached another valve to a quick connector bit that can be snapped into the front or rear quick connector and used to put air into the tank without having to use the valve inside the Jeep. I also carry an assortment of chucks, spare valve stems and the tool used to install valve stems, a valve stem tool that can remove the core, rethread the valve and clean out the valve tube. And of course a regular tire pressure gauge. |
 |
| My next design issue was the bleeder valve. In order for this to work, it needs to be the low point on the tank. The problem arises that when the bleeder valve is installed on the tank, it sticks down and is very vulnerable. I am planning on omitting it and instead just installing a plug that I can remove when I need to bleed the tank. | |
| The rude awakening came when I totaled up the money spend on fittings and plumbing. This stuff adds up fast! I returned a lot of extra stuff when I finished my work! | |
Update:
9/28/04  I had to install a valve stem. All the tools and parts I needed were right here! |
|
Need | Design | Installation | Testing / Adjustments | Compressor Info | Oasis Trailhead automatic tire deflators | Misc. small tools
| Install | |
| The hard part of this job after laying out the plan is running the plumbing. It must be tucked up where it won't get snagged on ANYTHING, and it must be virtually air tight. I say "virtually" because, in this world, nothing is absolute. I will be happy if I cannot hear any air leaks and the tank holds pressure for a couple days. | |
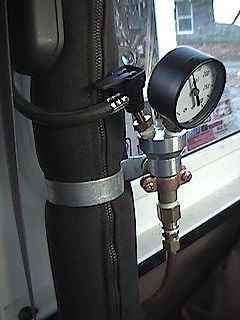
| As always, I had hopes for running the tubing to the cab-mounted compressor without drilling... I ended up drilling a hole near the corner of the floor where the center sport bar is mounted and ran the tubing up the outside of the sport bar. At the top, I mounted the manifold with the valves and gauge. This will put it in position for using the compressor and the gauge will be easy enough to see from the driver's seat. |
|
| Time to put it all
together! I started by reviewing my hardware inventory to be sure that I had
everything. Once I was convinced that it was all there, I plugged the spare holes on
the tank with 1/4" brass plugs. As with all fittings, I used teflon tape to
provide the sealing function. The guy at Home Depot told me that I could use Pipe
Joint compound unless I was going to have Oxygen in the tank. Well I am not going to
have Oxygen, but having used "pipe dope", I find it messy, so I opted for the
teflon tape. I chose to plug top hole and the inboard hole on the rear end of the tank. The outboard (closest to the frame) holes will take the tubes going to the front and rear of the Jeep. The inboard hole on the front of the tank will take the tube leading to the manifold and compressor fitting. |
   |
|
I test fit the tank
one last time. I found that the mounting feet nestled nicely against the gaps around
where the floor reinforcement plate for the seat mounts went. I held the tank in
place with my floor jack but could not mark the drilling locations because of space
considerations. So I took the tank down and made a paper template. I just placed the tank on a piece of paper and traced the feet on it, then cut it out. Then I taped it to the tank feet and poked holes where the bolts go. I took the template and lined it up with the mounting location using the previously observed fit as a reference. I used a center punch to mark the location to drill for each bolt. Then I measured the spacing between the holes and compared it to the tank feet. It matched so I drilled the holes after first removing the carpeting from the foot well in the drivers side back seat. It's one thing to have four new holes in the floor and quite another to have matching holes in the carpet... |
| Once this was done, I repainted the holes to help prevent rust from getting a foothold. I put the bolts through the holes from inside and let them drop through. I raised the tank back up using the floor jack and lined up the bolts with the mounting bushings on the tank. This part was a little tedious because the rubber bushing has a brass center in it and the space between the bracket and the tank is small. Coupled with the fact that I was attaching a washer, locknut, then a nut, and it was a fumble-fingered mechanics nightmare. To add insult to injury, the bolt and nut had to both be held during the tightening. | |
|
First I measured the
run for each length of tubing, taking into account all the twists and bends that they will
make. When I am satisfied that I have it right, I cut the tube with a hack saw,
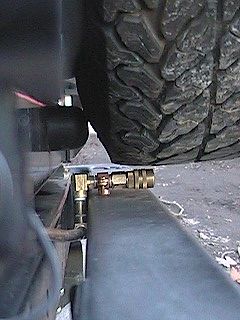
being careful to get a nice square cut without distorting the tube. Next I use a tube bending spring to contort the tube to the right shape. The spring keeps the tube from flattening out and makes it easier to work with. Once the tube is bent to shape and located in position, the clamps are placed in position. Finally, the ends are attached to the compression fitting that is already threaded into the rest of the system. Finally, the tube clamps are attached to their mounting points along the frame. |
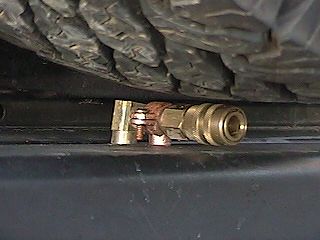
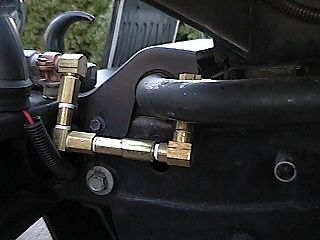
| I stepped off the quick connectors at the ends with short lengths of brass nipple so that I could hard-mount them in position without stressing the soft copper tubing. I set the quick connects back so they will not hit stuff easily as I go down the trail. I had to spend some time plotting out the front connector so that it would not interfere with the sway bar (connected AND disconnected). This lead to a revision that you see to the right. |
|
| After
checking the fittings to be sure that they are all properly tightened, and that all the
tubes are clamped in place, I pressurized the system using my shop compressor to look for
leaks. In order for the tank to hold air during a trip, the system needs to be
tight, otherwise the tank is pretty useless. For now, I am using the portable compressor without a safety shut-off. I plan to put one on the tank and hard-wire the compressor through it, so that it can be shut off automatically when the pressure hits about 140lbs. Yes! (clenched fist thrust down to side of body with look of pain/angst/success on face) The dirty deed is done. I revised a couple things to clean up the transition from copper tube to brass fittings and quick connect. I decided to run brass tube and elbows all the way in from the quick connect on the front because the copper tube was getting grazed by my sway bar on the way to work. Since it is pretty exposed there, I might as well make it as hard as possible. I did the same where the copper comes through the floor to the outlet in the cab - lots of foot traffic above the tube, even though it spans the small space between the bottom of the back of the passenger seat and the seat belt reel, I have seen the kids get their little feet down in there - might as well just be sure that it does not get crushed.
|
|
 |
The quick release on the back was too high and kept me from putting the spare tire back on so I had to fiddle with that to get it down out of the way. I will probably re-route the tube going to it and use some more brass "nipples" as they call them. |
Need | Design | Installation | Testing / Adjustments | Compressor Info | Oasis Trailhead automatic tire deflators | Misc. small tools
| Final
Adjustments
|
| Anyway, After I got
side-tracked with greasing my disconnects while I was routing the front connections, and
seriously whacking my index and middle fingers with the spring do-hicky that goes into the
grease gun. That led me to take a break while my fingers returned to their normal
size. Fortunately they still work right. I pressurized the system, tweaked one fitting (I can't believe there was only one leak...) and ran it right up to 60 pounds using my weenie compressor (about 10 minutes). It takes about 30 minutes to get to 125 psi.
|
| Then let the pressure
out and I drove down the street to the nearest gas station. It had a maximum pressure of
80psi - no audible leaks, the tank held without a visible pressure drop for 5
minutes. So home I went and cranked up the shop compressor (about 105psi) and topped
out the tank at about 100psi. Still no leaks and holding after 10 minutes at 100psi. This
is good. I flipped on the on-board compressor and had it up to 125 psi in 10
minutes. I called it quits for the night and went to bed. The next morning I was disappointed to find that the tank had lost all pressure. So I spent some time on the connections with soapy water and tightened them down good, just enough to stop the little bubbles from appearing. But since I am compulsive, I went one step further - I bought three cans of Fix-A-Flat (the kind that does not damage paint) and shot one can into the front line, one can into the rear line, and one can into the feeder line. Then I attached a fitting to each line and blasted the stuff back out each line a couple times with some time between blasts. Then I repressurized the system and let it push that fix-a-flat goo into any remaining leaks that might be there. I should note that I removed the Pressure Gauge during this exercise because it would not tolerate gooey sticky latex inside it. After the system sat overnight (with negligible pressure loss), I opened up the bottom drain and removed all the remaining fix-a-flat fluid from the system. I sprayed out each tube until no residue came out. Then I put the gauge back on and closed up the system and pressurized it. It sat overnight at 125 psi, and in the morning it was at 120psi. I can live with that. Most of my trips take about 5-10 hours before I need to air up again so that kind of pressure drop is not going to be a problem for me. It might get better with use, and the difference could even be accounted for by atmospheric pressure and temperature changes. |
Need | Design | Installation | Testing / Adjustments | Compressor Info | Oasis Trailhead automatic tire deflators | Misc. small tools
| Compressor
|
|
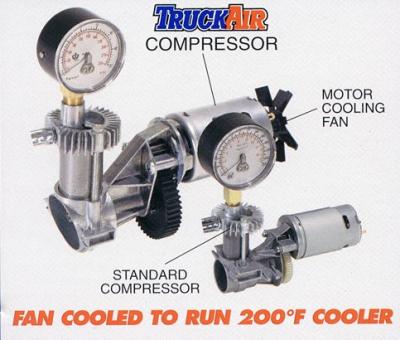
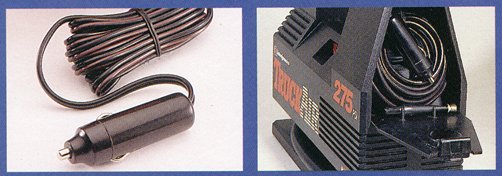
| Here is the info about
the portable compressor that I am using. There are lots of 12-volt portable
compressors on the market. The vast majority of them are pretty flimsy. Many
have other features that I had no need of.
Finally, when I had about given up on finding anything remotely useful, I found this unit. It claims to perform better than most I looked at. It is still not going to re-seat a bead on a tire (without an air tank...), but it will get me aired up from 15 back to 30 pounds in about 1/2 hour for all four tires (with the air tank it is much faster). If there is no close service station, this is not so bad. And if I need it after a field repair of a flat, it really doesn't matter how long it will take because the alternative of no compressor will most often require a walk out (certainly longer than 1/2 hour...) I tested it out in my driveway and got a 225/75-15 tire aired up in about 7 minutes from 15 to 32 pounds. I felt the case of the compressor. Not even warm. It works for me. In the process, I blew a fuse on the cigarette lighter circuit trying out the compressor before I started. And this reminded me that I needed to get fuses to spare and put them in the Jeep where I could find them if I need them. So I did that (because I didn't have any fuses handy...would have been in trouble if I had not tested it first and blew the fuse in the woods.) I used this on my trip to State Line Trail and found that it brought my four 30" Scorpions back to 35psi from 24psi in the same time that a QuickAir 2 aired up some 33" BFG AT KO's, so it terms of performance it is pretty decent. So for about $40.00, do yourself a favor and get a good compressor like this one. Look at it this way: You can save and save for that killer system that will inflate a blimp in 10 seconds, but until you get it, you need SOMETHING! I got mine at K-Mart, and suspect that the one generically described by J.C. Whitney may also be this unit (but I am NOT sure on that).
More pictures here interdynamics Truck Air Compressor Model HD-275
|
Need | Design | Installation | Testing / Adjustments | Compressor Info | Oasis Trailhead automatic tire deflators | Misc. small tools
Viar Tanks and Accessories | interdynamics Truck Air Compressor Model HD-275
Return to Jeep Specs
Jeep Build Sheet | Shop for Jeep Toys and Books | See the Toy Jeeps | Off-Road Index
Photos, Layout and Design © 2001-2008 Paul M. Provencher All Rights Reserved.
Contents of this Web Site may not be used without written permission
Visitors since 5/21/01
Last Updated 02/09/2008 10:48:24 AM -0500
12766 4/6/06